Good Morning!
Today I'll be sharing how I made the heart garland that was on my Shadow Box Tray from yesterday's reveal...
Supplies:
Old Book or Old Sheet Music
Fiskar's Heart Punch
Sewing Machine
Thread
Ranger's Distress Ink
Scrappy Glue
I started off by grabing my Fiskar's Heart Punch and some scrap book pages. I punched a ton of hearts, but just do as much as you think you'll need.
I then inked the edges of each heart. This is the most time consuming, but it does make a difference since you'll be layering your hearts.
Stack your hearts, one on top of the other, evenly (I used 2 different patterned hearts so you could see the contrast).
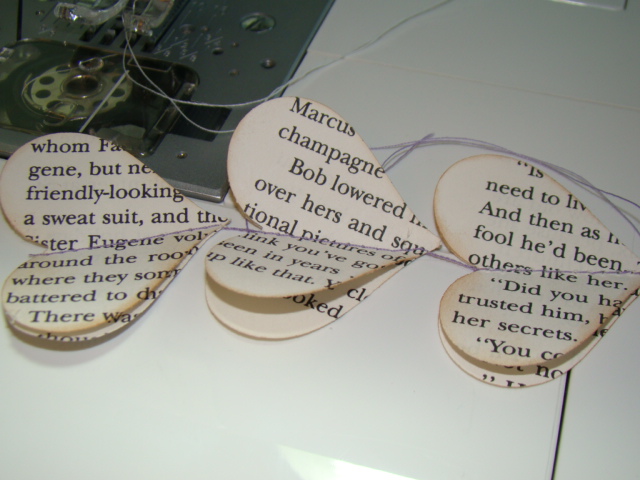
Take your stacked hearts to your sewing maching and start sewing. I do one set of hearts at a time. I don't backstitch, I just start doing a straight stitch down the center of the hearts.
Once I got started, I just kept adding hearts. Once I was at the end of one heart, I'd grab another set and start all over, keeping them all on the same thread. You can do as many as you want in a row.
Here's what they look like when you're done. You can see just a little amount of thread between each heart set. If you wanted more space you could keep sewing between each heart for a longer amount of time.
Just for my comfort, I then add a small dallop of glue to each of the ends - where the threads start and stop on the hearts. I only do this to the first heart that I sew and the last - I don't worry about the hearts in the middle. I use the glue inplace of backstitching.
I then separate each heart set so that you can see both of them. I like this because it seems like it adds a little more dimension.
That's it! Glue your heart banner to any card, layout or shadow box! You could even just use these for home decor!
Well, that's it for me today! I hope you have a great weekend, and maybe you can play along with us and try any of the tutorials that the Design Team has posted!
Andi


No comments:
Post a Comment