Background

Wednesday, August 31, 2011

2 Great Classes Available


Oh Happy Day! Banner - Join Andi and create this canvas banner that be used for many occassions - birthdays, spring, just because, valentines... if you can think of a reason to be happy, you can think of an occassion to use this banner! The canvas pennant are handmade by Andi, you'll be using the Authentique Splendid paper collection, you'll learn how to make yo-yos, we'll be use crochetted doilies and glass glitter, ribbons and pearls!

Teacher – Andi   Cost $28.00
Saturday, September 10th   11:00am – 1:00pm
Travelogue - Let's go on a journey with the new line of papers by Amy Tangerine for American Crafts! We'll create a custom book filled with found items like doilies and notecards as well as over 20 pages to fill with memories of your favorite vacations, places, and adventures.  Kit includes a full set of layered, embellished Amy Tangerine stickers, a full set of Authentique alpha stickers, and loads of buttons and unique goodies Jennifer's classes have become known for. 

Please bring: Bind It All if you have one, scissors, paper trimmer, 3D Foam Squares (3L Scrapbook Adhesives Brand), Strong Liquid glue or hot glue gun, black pen, glue dots, ColorBox Fluid Chalk Ink in Chestnut Roan (optional).

Teacher – Jennifer Priest   Cost $38.00
Sunday, September 11th     1:00pm – 4:00pm

Tuesday, August 30, 2011

Our last DT project for August!

Yay!  Today is our final DT reveal for August and I'm so happy to share Michelle's project!

Michelle made this great bottle neck tag - I love that it doesn't just lay flat, the fact that it's squared really gives it a nice, clean, stand-out look!  This is a great hostess gift - if you were giving something like this as a teacher gift or as a hostess gift, you could substitute a picture of your child or family in place of the wording.


Michelle used the Doodle Bug paper line, along with twine, Stickles and plenty of pop-up dots to make this bottle neck card stand out!

Great job, Michelle!  We'll see everyone in a few weeks for the September projects!  If you've been looking for layout inspiration, you'll be very happy!

Remember, we're taking submissions for our Winter DT term, so please apply!  We love to see new talent!  Even if you've applied before, please apply again!  Check out our post, here, to get more details on the DT Open Call!
 

Monday, August 29, 2011

More Design Team Projects

Hello!

Happy Monday!  Hopefully everyone had a great weekend, keeping cool in this heat wave!  We have 2 more days of DT projects and then we'll be creating and working on September's projects!  Let's take a look at Debbie's last card, which has another great, handmade embellishment on it!


Yo Yo Card Tutorial


For this card I used two tools to make my embellishments, I used the Sizzix Tim Holtz Rosette die to make the accordion flower. This flower can also be done with a scorer by cutting a strip of paper approximately 1" - 2" depending on the size that you want, then edging it with a scalloped edge and scoring at the peaks and valleys of your scallop. This is a fun flower to use on cards and layouts.


I also used my epiphany round to make the 3 buttons across the top of the card. This is such a fun tool to use because you can make a fun button from the paper that you are using so everything matches really well. You can find these Epiphany tools in the store and they are fun to use on lots of different projects.

Thanks, Debbie!  Please stop into the store to see this sample up close!  And you can also check out Becky's step by step tutorial from July for the yo-yo flower here!

See you back tomorrow for our last project with Michelle!
Andi


Friday, August 26, 2011

Page's Design Team Call

· Are you fun? Are you innovative?

· Do you love paper crafting? Or all crafting?

· Are you blog savvy? If not, are you a quick learner?

· Do you like free product and sneak peaks of upcoming product and trends?

· Do you LOVE Pages from the Heart?


Seeking:

We are looking for individuals to represent Pages from the Heart! We are looking for people who are open to support our blog and support events and projects at the store.


The Jist:

You will be expected to create assigned projects each month to be posted on our blog and turn in samples to the store for display. Projects can range from Layout samples, to cards to 3-D projects!  These samples will need to have easy to read instructions  or descriptions that we can include in our blog posts; tips and tricks are also appreciated! We’re looking for ways for people to stay inspired to use the supplies that they have and the new supplies offered at Pages. In return for your projects, you will earn store credit from Pages.


The Deal:

· The term will be for 6 months starting October 7th with your 1st projects due November 1st.

· Applicants must be 18+ years old.

· Open to everyone but must be willing to attend occasional meetings or webinars, and special events at Pages from the Heart.

· Design Team experience is not a must, but doesn’t hurt either!

· You’ll be supplied monthly (or as needed) with store product. You’ll have to complete your assignments using the products in the time allotted – you’ll get to keep the leftovers AND earn credit to get more goodies! It’s a win-win!

- You will be asked to create tutorials of some of the assignments you create, you will know about tutorials ahead of time.  You will also be required to write a brief "blurb" about each project that you create that can be included with pictures of your project on our blog.

- We post a "Challenge" every month and ask for your help, but it is not mandatory.

· New members will be contacted by October 7th.


How to Apply:

Please send pictures of:

· 1 double page layout or 2 single page layouts

· 2 cards

· 1 3-D project


To ayokleyjessup@gmail.com. Please keep file size small! You will not be judged on your photo skills, but to get a good idea of your work your photo will have to be clear and show good details. All samples must be original to you!!! If you are chosen for the Design Team, your samples will be displayed at Pages for 2 months and then returned to you.

Include a little about yourself, like…

· Name

· When did you start paper crafting?

· Are you on any other Design Teams or do you have any Design Team experience?

· What are your favorite company’s or products? Do you have a passion for Glimmer Mist? Stamps? Paper? What’s your vice?

· Do you have a blog? If so, please send me the link!

· Do you follow any blogs? If so, please let me know some of them!

· Have you even been published? Do you submit your designs?

· What style are you? Do you like clean, simple designs? Are you vintage? Or shabby? Or something totally unique, like vintage with classic lines?

· Anything else that you think is important about yourself. I don’t need your life story, but I would like a good idea of who you are and what drives your paper crafting passion! Crafting is part about expression, but then also about your story and connections to people!

Submissions open till Sept 30th, Midnight!

Thursday, August 25, 2011

Ruffled Flower Tutorial! Finally!

Tutorial Thursday!  Yay!  I know that many of you have been waiting for Debbie's Ruffled Flower tutorial and I'm so happy to say that we finally have it for you!  Here you go!


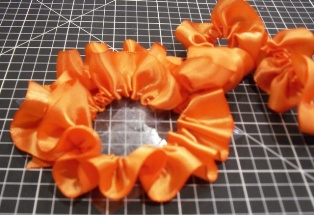
For my handmade embellishment I decided that I wanted to do flower made from pleated/ruffled ribbon, however, I was at a crop and didn't have any ruffled ribbon with me.  I decided that I could make my own.

I took some ribbon and used a needle with some thread and did a running stitch - and then gathered up the ribbon.


I then cut a circle from some Be Creative® Tape Sheets and started on the outside edge of the circle and wound the ribbon around until I reached the center.


I added a drop of glue at the center before pressing down the end of the ribbon to makesure that it took hold.


I hope that you enjoy it and will give it a try and make your own.

Thanks, Debbie!  This is a great tutorial since ribbon and fabric flowers are super hot right now!  Just think, you could use this embellishment on a page or card, or go outside the papercrafting box and create a brooch or hair accessory!

We'll be back tomorrow with the OPEN DESIGN TEAM CALL!!!!!  So excited!
Andi

Wednesday, August 24, 2011

Wednesday "Wow" with Michelle!

Happy Wednesday!

(NOTE - this post was scheduled for 6:02 this morning but didn't actually post!  Grrr -Sorry for the delay!)

I hope everyone is getting over the middle of the week blues... only a few more days till the weekend!  And then the weekend after that is a L-O-N-G weekend!  I'm hoping to get some serious cutting, gluing and creating in!  Anyways - back to the DT projects!  Let's take a look at Michelle's seriously cute card!

Isn't that flower cute?  And it's pretty easy to make!  Here, take a closer look!


Michelle had Doodlebug paper, which had a birthday feel but I think that her card could be for any occasion!

Thanks, Michelle!

We'll see everyone back here tomorrow for another DT project and Friday I'll be posting the next term DT Call!!!
Andi

Tuesday, August 23, 2011

Let's welcome back Debbie!

Hello!

Today we're going to share another project that Debbie created!  Debbie was a total over-achiever this month and created more than 1 handmade embellishment - let's take a look!


Debbie had American Craft's "Confetti" line.  I love all of the different layers, and the mint green and orange combo! 

And can you see Debbie's other handmade embellishment?  Yep!  The crocheted flowers!  Aren't they adorable!  I really wish I could crochet when I see cute projects like this!


Thanks Debbie!

We'll be back tomorrow with another project from Michelle!
See you then!
Andi

Monday, August 22, 2011

Monday with Michelle

Hello!

First off, I am so sorry about the delay in posts!  I worked on Debbie's tutorial for the ribbon flowers last week but Blogger was not cooperative!  Now I'm having problems getting the photos for the tutorial to load!  I promise to get you the tutorial as soon as possible, but for now, thank you for your patience!  I love and loathe technology!  I love it when it's working properly (or when I know how to work it), and loathe it when it doesn't (or when I don't know how to use it!).

Okay, so let's take a look at one of the projects from Design Team member, Michelle!


Michelle designed a 12"x12" layout around her nephews birthday party - which this perfect for Doodle Bugs "Birthday Boy" paper line!  Michelle used Sketch #159 from Creativescrappers.blogspot.com.  Michelle emphasized the designs on the paper by hand cutting some of the balloons from the patterned paper, which she then tied with wired cord for the strings.  I also really like how she used the wired cord and wrapped it around her brackets - they really "pop" with it the extra dimension!


I love how she cut out a party hat from the paper and popped it up on her nephews head!  Super cute!

Thanks so much, Michelle!

We'll be back tomorrow with more DT inspiration - I PROMISE!
Andi


Tuesday, August 16, 2011

Debbie's Layout

Today we're going to be looking at a two-page layout that Debbie made for her Design Team project.  She made a handmade embellishment for the layout that she'll be sharing a tutorial for tomorrow.  Let's take a look!


Debbie had American Craft's birthday paper for her kits, aren't the vibrant colors great?  I love the minty green/blue with the orange - they really pop together.  Her pages are mirrored images of each other and I love how she wove the ribbon through her punched border at the bottom of her pages.


Did you guess what the tutorial will be on tomorrow?  Yep, Debbie's going to share how she made this great ribbon flower!  These are super popular right now, and the best part is that she didn't use ruffled ribbon, but a regular satin ribbon!

We'll see you tomorrow - have your needle, thread, ribbon and glue (or gluber) ready for some action!
Andi

Monday, August 15, 2011

Monday Morning Making's!

Hello!

I hope that everyone had a great weekend!  Maybe you got some cardmaking done... or some pages... or a mini-album that showcases your fun times this summer... or did you get a chance to try any of the tutorial's that we've shared over the past few months?  Well, what ever you did, I hope that you're ready for more inspiration - with Debbie!

Debbie went crazy with this months kit, she created so many different projects that we'll be "oohhhhing" and "aahhhing" for some time!  Let's get started with a card that she created 


This is a card that I made with my kit.  It was fun to make a ruffle across the bottom.  I used my scorer and starting scoring at 1", then 1/2", then 1" again and followed that pattern throughout.  I then folded it and put glue dots at the top where it overlapped to hold it in place.  I then cut a very narrow strip of paper and weaved it through a trim that I had and inked with holes in it to adhere across the top.
Thanks, Debbie! 

We'll be back tomorrow with a great 2 page layout from Debbie!

Have a great Monday!
Andi

Friday, August 12, 2011

WE'RE SHOPPIN',HOPPIN' AND CROPPIN' - NEW YORK CITY STYLE


We are in full croppin' mode here at Pages this weekend. We are winding down the Shop Hop with a 3-day Crop Extravaganza full of fun, food and friends - all New York style! New York City foods are being served too - deli sandwiches, bagels, hot dogs and more! Saturday night even includes a FREE (yep, I said "free") Spa treatment for those of you stopping in and/or attending the crop ( from 5:30pm to 10pm).

Christina's Flower Tutorial

I'm sorry that this didn't get posted yesterday, but I think it's a great way to end the week and an even better way to start the weekend!  You'll definitely want to grab the supplies that Christina listed and make a few of these!

Here we go!  Take a look at what we'll be learning about today!  I just love these flowers!

And here's Christina!

So I'm sure by now you've all seen that there are so many ways to create a huge variety of paper flowers. Below, I will explain how to make my most favorite kind, which I love because it is three-dimensional and has a very real look to it! I called them 3-D Tattered Heart Flowers!


First, you need to cut out a bunch of hearts in 4 sizes. They can be all the same paper or a combination of different ones, but they should be double-sided cardstock to get the best looking results. I used paper from the Authentique "Uncommon" line. I cut 3 small, 4 medium, 5 large, and 6 extra-large hearts for each flower. Of course you can do it with a little less or more, but this amount gives a nice fullness without needing a longer brad which may be difficult to find. For those of you with a cricut, it is probably easy to get these all cut out quickly. I don't have one, but luckily I had an old Sizzix die that had 4 sizes on it.


Next, hole punch them all at the bottom and stack them all in size order, the smallest ones on top. Put a brad through the entire stack, which is pretty thick, so make sure you don't use one of the shorter brads.


Spread out all the hearts like a fan all the way around the brad. At this point, it already looks like a cute flower that can be used on a variety of projects! You can even curl each of the "petals" backwards with a pencil to give it dimension and use it that way. But if you want to create the tattered flowers I made, read on!


Spray the flower with water (a mini-mister is great for this!). This makes the cardstock more pliable and also helps it hold its shape once it dries. Then take each heart and "scrunch" it towards the center. Doing this gives it a distressed look.


Continue to curl up and scrunch each of the petals until it's all done. Continue to spray water on each layer as needed (don't make it dripping wet). Make sure to smush up each petal separately. At the end, don't be afraid to even take the entire thing and crumple it in your hand! The more wrinkles it has in the paper, the more fabulous it looks since you can shape it better.


Lastlly, mold each of the petals just how you want. That's the beauty of these 3-D flowers, you can manipulate the petals in just the right position! Then let them air dry or use a heat gun for quicker results. They are fairly sturdy if you use good cardstock. Add them to any papercrafting project - you can even use them as a broach or on a headband!! I hope you like these flowers as much as I do =)

Thank you so much, Christina!  I'm definitely going to try these this weekend and show you guys what I create next week!  I hope that you have fun giving these a whirl!
 
Have a great weekend and we'll be back next week with Debbie and Michelle's projects!
Andi

Wednesday, August 10, 2011

Christina's Turn

Hello!

Today is Christina's turn to show her project and her handmade embellishment!  You're going to love it and the tutorial is great!  I can't wait to give it a shot!  Here, take a look!


Here's what Christina had to say.

I had the opportunity this month to create a project using the beautiful pink/cream/gray line called "Uncommon".  It is from one of the newest paper companies - Authentique - that is headed up by someone you may recognize, Margie Romney-Aslett.  This paper line is a nice thick, lightly textured two-sided cardstock that feels somewhat like water color paper.  I used the paper called "Gifted" for the background, and "Distinct" for the matte.  The paper stamps is from paper called "Rare" and the doodl-ish gray heart border of words is a sizzix die cut from the back of the "Gifted" paper.  The pink strip behind the picture is from the "Foundations" set, which is two 12x12 papers connected together that are basically the solids of the line, though they have some faint print as well.  Come see the Authentique line for yourself - there are several varieties and they have great embellishments!  I'm sure you will fall in love with them all!


This layout is fantastic.  I love the colors, the flowers, the stamps! Thanks, Christina!  

Check back in tomorrow to see how Christina made those awesome flowers - you will be impressed and you'll totally want to grab your supplies and make a few yourself.

Have a great day!
Andi

Tuesday, August 9, 2011

Glitter Embellishment Tutorial!

Hello Again!

I'm back today to share my tutorial on how to create a glitter covered embellishment that has NO drying time and NO glue!  You don't believe me?  Then take a look!

Here's the embellishment that I have on my DT sample.
You'll need a Xyron "X" (or any Xyron adhesive machine); you'll need the permanent adhesive cartridge for it.  You'll also need a clear glitter, the finer you go the better you'll be able to see your image underneath.  You'll need a die cut or a a saying (I used one from the Authentique Die Cut sheet) and a TidyTray (or paper plate).


Take your die cut image and put it in your Xyron "X", FACE DOWN!!!


Pull it through and tear it off.  Then rub down on and around your die cut.  If you let if sit for about 1 minute after rubbing it you'll get a better and cleaner adhesive.


Remove both the clear sheet and then remove the die cut from the wax coated sheet.


Place your die cut onto your Tidy Tray and sprinkle with glitter.  Press down on glitter and rub so that the excess comes off your die cut.  Rub your fingers around the edges so that your die cut is clean.  Now enjoy your glittery, clean and dry glittered embellishment!


That's it for me today!  I'll be back tomorrow to share a project from Christina! 

See you then!  And don't forget to submit your challenge project!  Remember, bragging rights and a goody bag!  You can't go wrong with that!!!
Andi

Monday, August 8, 2011

It's that time already! More Design Team projects!!!

Hello hello!

It's Design Team reveal time again!  Can you believe it?  Can you believe that it's also August?  That's a shocker for me, I feel like summer just started and I'm already thinking about fall projects that I want to make with the fun new paper that is arriving at Page's daily from CHA!

Okay, onto today's reveal!  I'm going to start off this week with my project, which is made from the new and beautiful Authentique paper!


(Splendid)

(Uncommon)

(Blissful)
I had Splendid to work with, I love the vintage, shabby chic feel of the paper.  It's a heavy weight cardstock, which is so nice because it made my project feel really sturdy without using chipboard for my pages.  Let's take a look at what I created!

I created this pretty little desk album that I adore!  It's so pretty, so girly... and it was so much fun to create!  Using the Authentique paper was like having permission to make the prettiest project that I could think of!  Take a look at some of the details from the book.


Please stop into Page's to take a good look at the book and see all the different pages.

This month we'll be sharing our projects that have handmade embellishments and, along with our projects, we'll be sharing tutorials on how you can create the same embellishments.  I'll be back tomorrow to share a tutorial on how to make the crystal/glitter coated embellishments (pictured above).

Remember to check out the Page's Challenge - you'll be glad that you did!

See you tomorrow!
Andi