Howdy Peeps!
Welcome back! Today I have my last project for the week. In addition to the cards, I also made this layout using the "Black Widow" collection by We R Memory Keepers.
The picture in this layout has special meaning to me. It was taken at a Trunk-or-Treat event held at the school I was working at the time. These two little girls really thought I was Sonw White. They asked their mom, "How did she get here from Disneyland? Doesn't she have to go back?" They were SO excited to get to meet a "real" princess that it really touched my heart.
I had some leftover hexagons from the card I shared earlier this week so I featured some on this layout. The doily was punched from the mini Lucky 8 punch sold at Pages. I used a small corner that is hidden behind the layering on a different card that I shared yesterday! No wasted paper in this craft room!
Thanks for checking out my projects this week! As always, they are on display at Pages From the Heart.
XOXO,
Becky
Background
Showing posts with label Design Team. Show all posts
Friday, October 19, 2012
Wednesday, October 17, 2012
Witchy Halloween Cards
Hello Peeps!
Becky again with two more Halloween cards using the "Black Widow" collection by We R Memory Keepers. This line is now in stock at Pages From the Heart.
Coming up with a sentiment with the word "witchy" in it was a little tricky but I think "Witchy Wishes" works well! The spider and sentiment are both a part of the "Witchy" stamp set. I embossed both of them with clear embossing powder for a different effect.
The witches hat came from the same "Witchy" stamp set I used in the previous card. I added orange Stickles in between the stripes because one can never have enough sparkle! The doily was cut using the new mini Lucky 8 punch by We R. These are in stock at the store and very easy to use!
I'll be back later this week with a Halloween layout with a sweet story. Thanks for reading!
XOXO,
Becky
Becky again with two more Halloween cards using the "Black Widow" collection by We R Memory Keepers. This line is now in stock at Pages From the Heart.
Coming up with a sentiment with the word "witchy" in it was a little tricky but I think "Witchy Wishes" works well! The spider and sentiment are both a part of the "Witchy" stamp set. I embossed both of them with clear embossing powder for a different effect.
The witches hat came from the same "Witchy" stamp set I used in the previous card. I added orange Stickles in between the stripes because one can never have enough sparkle! The doily was cut using the new mini Lucky 8 punch by We R. These are in stock at the store and very easy to use!
I'll be back later this week with a Halloween layout with a sweet story. Thanks for reading!
XOXO,
Becky
Tuesday, October 16, 2012
Spooky Halloween Cards
Hi there Peeps!
Becky here and this week I will be sharing some Halloween projects I have been working on. This month I worked with the new "Black Widow" collection by We R Memory Keepers. It is now in stock at Pages From the Heart so come on in and check it out!
Today I have two cards that I made.
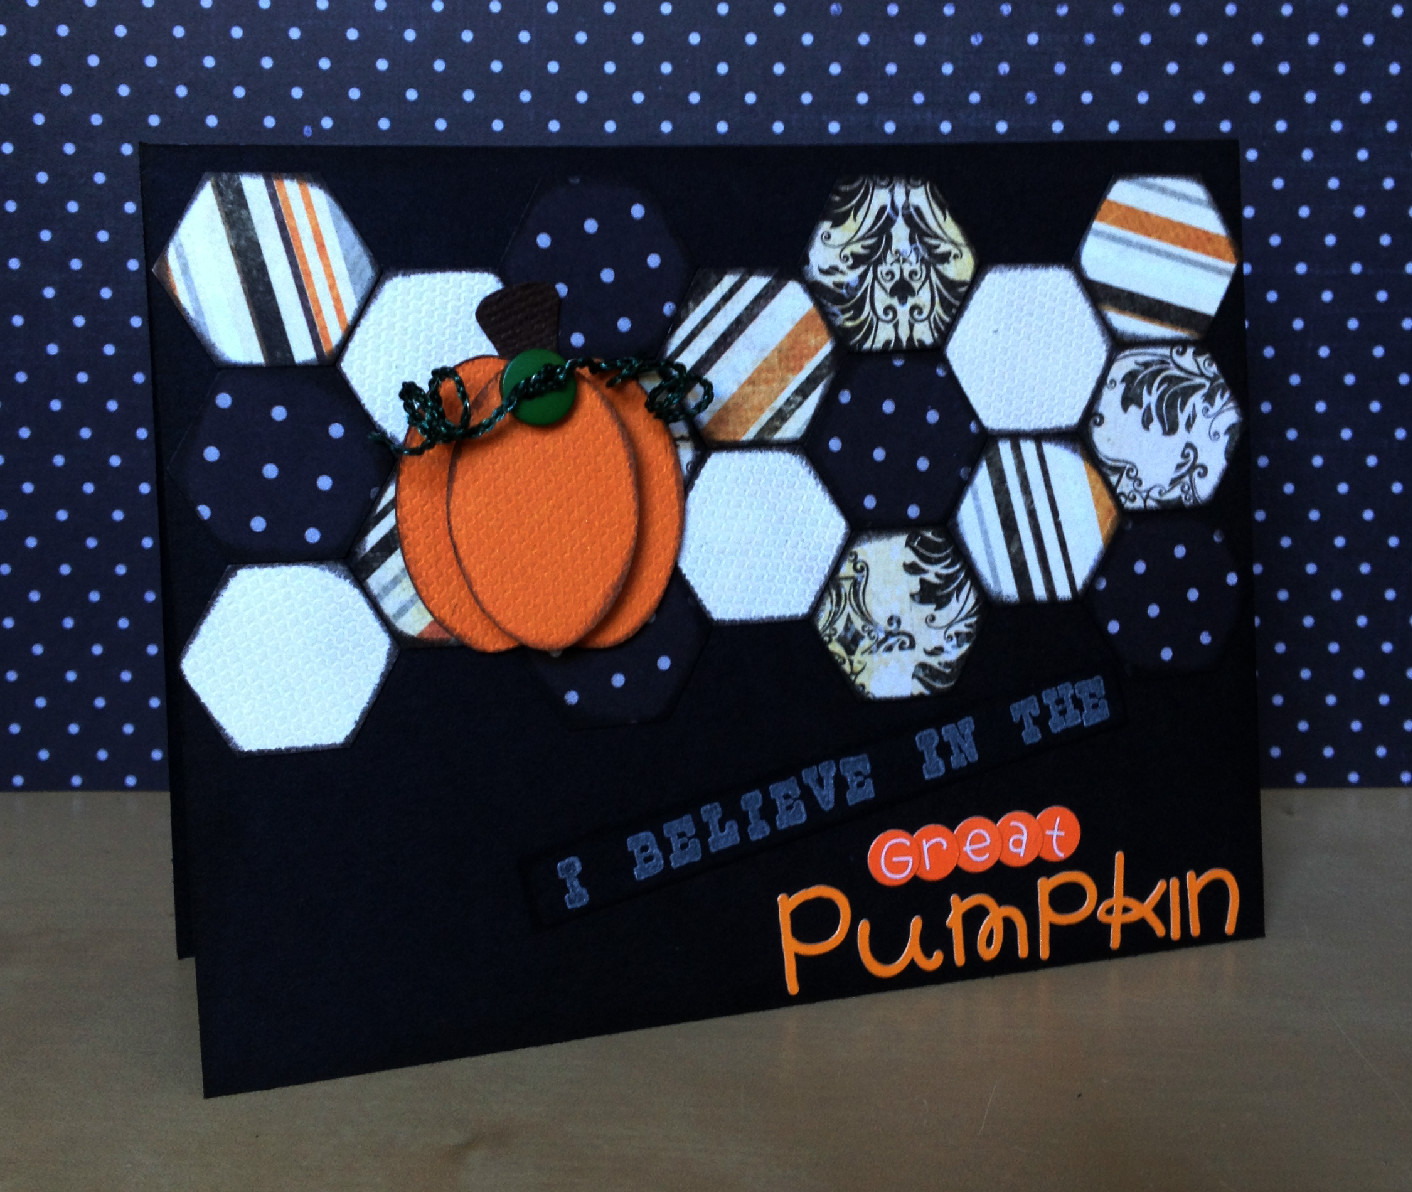
This card is a homage to one of my favorite movies ever, "It's the Great Pumpkin, Charlie Brown." I have watched this movie every Halloween for as far back as I can remember. I used a hexagon punch to punch out the shapes (although this would work well with any small, repeating shape). I pieced the pumpkin together by cutting three ovals and popping the middle oval up with foam squares. The orange letters are a new item at Pages From the Heart from Doodlebug.
For the second card, I used one of the large tags that are a part of the collection along with some scalloped squares. I used the Sew Ribbon tool by We R to add some sparkly ribbon. This tool can be found in the store.
Thanks for stopping by! I'll be back tomorrow more!
XOXO,
Becky
Becky here and this week I will be sharing some Halloween projects I have been working on. This month I worked with the new "Black Widow" collection by We R Memory Keepers. It is now in stock at Pages From the Heart so come on in and check it out!
Today I have two cards that I made.
This card is a homage to one of my favorite movies ever, "It's the Great Pumpkin, Charlie Brown." I have watched this movie every Halloween for as far back as I can remember. I used a hexagon punch to punch out the shapes (although this would work well with any small, repeating shape). I pieced the pumpkin together by cutting three ovals and popping the middle oval up with foam squares. The orange letters are a new item at Pages From the Heart from Doodlebug.
For the second card, I used one of the large tags that are a part of the collection along with some scalloped squares. I used the Sew Ribbon tool by We R to add some sparkly ribbon. This tool can be found in the store.
Thanks for stopping by! I'll be back tomorrow more!
XOXO,
Becky
Thursday, September 20, 2012
Back to School: Rolodex Mini-Album
Hello Peeps!
Today I am sharing my last back to school project. My last two projects were both gifts that would be great for a teacher at any point in the year. Today I have a mini-album for parents to share pictures of their student through the years.
I started with a Rolodex. I have heard these can be found regularly at thrift stores but after months of searching, I finally broke down and bought one at an office supply store.
Supply List:
Authentique "Curiosity" - Studious, Learning, and Desire papers
Authentique "Curiosity" - Details and Elements stickers
Coordinating blue and yellow cardstock
Tab punch
Rolodex
I created one tab for each grade level. Since my inspiration for this project has just started preschool, I made blank tabs so that his mom can add pictures as he goes through school. I also left the backs blank so that she can add her own journaling.
Thanks for checking out my projects this week. As always you can see them in person at Pages From the Heart.
XOXO,
Becky
Today I am sharing my last back to school project. My last two projects were both gifts that would be great for a teacher at any point in the year. Today I have a mini-album for parents to share pictures of their student through the years.
I started with a Rolodex. I have heard these can be found regularly at thrift stores but after months of searching, I finally broke down and bought one at an office supply store.
Supply List:
Authentique "Curiosity" - Studious, Learning, and Desire papers
Authentique "Curiosity" - Details and Elements stickers
Coordinating blue and yellow cardstock
Tab punch
Rolodex
I created one tab for each grade level. Since my inspiration for this project has just started preschool, I made blank tabs so that his mom can add pictures as he goes through school. I also left the backs blank so that she can add her own journaling.
Thanks for checking out my projects this week. As always you can see them in person at Pages From the Heart.
XOXO,
Becky
Wednesday, September 19, 2012
Back to School: Altered Paint Can for the Teacher
Welcome back Peeps!
It's back-to-school week here on the Pages blog and I am back with another project. This time it is an altered paint can that would make a great gift holder for your favorite teacher.
Supply List:
Authentique "Curiosity" - Interested, Studious, and Determined papers
Authentique "Curiosity" - Details stickers
Twine
Clothespin
Blue and white cardstock
Coordinating ribbon
You can find these cute plastic buckets at Pages in different sizes. The key to adhering paper to the bucket is using a strong, clear glue like Scrappy Glue.
Thanks for reading! I'll be back tomorrow with one more school project. This time it's a gift for parents!
XOXO,
Becky
It's back-to-school week here on the Pages blog and I am back with another project. This time it is an altered paint can that would make a great gift holder for your favorite teacher.
Supply List:
Authentique "Curiosity" - Interested, Studious, and Determined papers
Authentique "Curiosity" - Details stickers
Twine
Clothespin
Blue and white cardstock
Coordinating ribbon
You can find these cute plastic buckets at Pages in different sizes. The key to adhering paper to the bucket is using a strong, clear glue like Scrappy Glue.
Thanks for reading! I'll be back tomorrow with one more school project. This time it's a gift for parents!
XOXO,
Becky
Tuesday, September 18, 2012
Back to School: Post-It Holder
Hi Peeps! Welcome back...to school! This week I will be sharing some back to school inspired projects using Authentique's new "Curiosity" collection.
The first project I have to share is a Post-It holder. I made this using a plastic sign holder that I found at an office supply store. I placed paper inside the holder and then attached the embellishments on the outside. I adhered the Post-Its using glue dots.
Supply List:
Authentique "Curiosity" - Studious and Learning paper, Details and Elements stickers
Safety pin
White tulle
Post-Its
I'll be back tomorrow with another gift for your favorite teacher!
XOXO,
Becky
The first project I have to share is a Post-It holder. I made this using a plastic sign holder that I found at an office supply store. I placed paper inside the holder and then attached the embellishments on the outside. I adhered the Post-Its using glue dots.
Supply List:
Authentique "Curiosity" - Studious and Learning paper, Details and Elements stickers
Safety pin
White tulle
Post-Its
I'll be back tomorrow with another gift for your favorite teacher!
XOXO,
Becky
Tuesday, August 7, 2012
No Shoes, No Problem!
Welcome back Peeps!
Becky here today. This is day two of my August projects. Today I am sharing a card that I made using the Authentique "Fresh" line. It's a beach-themed collection but the amazing colors could be used for a variety of projects.
Supplies
Authentique "Fresh" Collection - Free, Pure, Elements Stickers
Red Cardstock
Red floss
On Pinterest I found this adorable layout using stitched hearts as an embellishment. Well I love circles and squares so I thought I would give it a try. You can check out my version of this layout on Thursday.
Thanks for stopping by!
XOXO,
Becky
Becky here today. This is day two of my August projects. Today I am sharing a card that I made using the Authentique "Fresh" line. It's a beach-themed collection but the amazing colors could be used for a variety of projects.
Supplies
Authentique "Fresh" Collection - Free, Pure, Elements Stickers
Red Cardstock
Red floss
On Pinterest I found this adorable layout using stitched hearts as an embellishment. Well I love circles and squares so I thought I would give it a try. You can check out my version of this layout on Thursday.
Thanks for stopping by!
XOXO,
Becky
Monday, April 9, 2012
April Design Team Reveals!
Good Morning!
I hope that everyone had a beautiful weekend! Today we're starting the April Design Team reveals with Michelle - so let's take a look!
Trio of Square Cards by Michelle McClure
Since the assignment this month is to make three cards, I thought it would be fun to make one type of card in three different ways. Then you'd only have to learn one method of assembling a card, and can spend the rest of your energy on decorating the card base.
This is the inside view. Each card is folded from one piece of 12 x 12" cardstock, with an internal area measuring 6 x 6" for your message.
This is the back view. The card folds together nicely, so you don't need an envelope, although I did make one to match if you did want to send one through the mail.
Supplies:
Featured Collection: Canvas Corp’s
Green & White Collection
Cardstock: Bazzill
Patterned Papers: Canvas Corp
Stickers: S.R.M. Press
Twine: The Twinery
Ribbon: May Arts
Punches: EK Success
Other: buttons
Card #1: Shirt
Starting with the same base, I decided to transform each square into a different object. With Father's Day coming up, I thought a shirt design might be fun to give dear ol' dad. The pocket can hold a tag with a secret message, and the bow tie is 3-D.
Card #2: Present
For my second card, I turned the square into a present with a giant 3-D bow. This would be good for any type of invitation or to go along with a birthday or wedding gift. You can modify it to any occasion that has a present involved. The bow is on a wrapper that slides off.
Card #3: Mortar Board
For my third card, I changed the square into a mortar board as graduation season is almost upon us. I made a tassel from twine, plus a diploma from a scrap piece of paper. I also made an envelope from a piece of 12 x 12" cardstock to match the card in case you want it to look more formal when presenting it to the graduate.
I made a template for the card, so stop by Pages if you want to see how to fold this versatile design. Be creative and have fun adapting these cards to suit any occasion.
Thanks for stoppin' by,
Michelle
I hope that everyone had a beautiful weekend! Today we're starting the April Design Team reveals with Michelle - so let's take a look!
Trio of Square Cards by Michelle McClure
Since the assignment this month is to make three cards, I thought it would be fun to make one type of card in three different ways. Then you'd only have to learn one method of assembling a card, and can spend the rest of your energy on decorating the card base.
This is the inside view. Each card is folded from one piece of 12 x 12" cardstock, with an internal area measuring 6 x 6" for your message.
This is the back view. The card folds together nicely, so you don't need an envelope, although I did make one to match if you did want to send one through the mail.
Supplies:
Featured Collection: Canvas Corp’s
Green & White Collection
Cardstock: Bazzill
Patterned Papers: Canvas Corp
Stickers: S.R.M. Press
Twine: The Twinery
Ribbon: May Arts
Punches: EK Success
Other: buttons
Card #1: Shirt
Starting with the same base, I decided to transform each square into a different object. With Father's Day coming up, I thought a shirt design might be fun to give dear ol' dad. The pocket can hold a tag with a secret message, and the bow tie is 3-D.
Card #2: Present
For my second card, I turned the square into a present with a giant 3-D bow. This would be good for any type of invitation or to go along with a birthday or wedding gift. You can modify it to any occasion that has a present involved. The bow is on a wrapper that slides off.
Card #3: Mortar Board
For my third card, I changed the square into a mortar board as graduation season is almost upon us. I made a tassel from twine, plus a diploma from a scrap piece of paper. I also made an envelope from a piece of 12 x 12" cardstock to match the card in case you want it to look more formal when presenting it to the graduate.
I made a template for the card, so stop by Pages if you want to see how to fold this versatile design. Be creative and have fun adapting these cards to suit any occasion.
Thanks for stoppin' by,
Michelle
Monday, February 13, 2012
February's DT Projects - Banners
Hello! Happy Monday!
This weeks starts our DT February Project reveals and the February Challenges. February's assignment was to create a banner - any type of banner - and our team did not disappoint!
Michelle's February project is going to be published in July's CREATE Magazine! Yay, Michelle! It is a chandelier inspired framed wall hanging in the style of a banner.
Today Becky will be sharing her banner - so take it away, Becky!
Supply List:
Doodlebug Classic Collection - Elegance Paper
Doodlebug Classic Collection - Cascading Floral Paper
Black and White Cardstock
Doodlebug Colorwheel Cardstock Stickers
Purple and Black Ribbon
Black Glitter
We R Memory Keepers Sew Ribbon Tool
Cricut "Sophisticated" Cartridge
Since the new year, I have seen several pictures of people's craft rooms, giving examples of how to organize just as Pages did last month. Amongst all of the great tips, I also noticed how nicely people had decorated their crafty space. So for my banner project I decided to make a "CREATE" banner to eventually hang above my scrap desk.
I started by cutting white 4 1/2" x 6" inch rectangles and 4 1/4" x 5 3/4" rectangles from the patterned paper. I then cut triangles from the bottom of the rectangles to form my flags. I used my Sew Ribbon to cut notches to be able to thread the flags together. Using my Cricut, I cut my title and circles to mat the letters. Usually I am not a fan of using glitter but I wanted an elegant, blingy look so I glittered my title with black glitter. I finished my banner by embellishing with the Doodlebug Cardstock Stickers, which provided the perfect pops of color!
Thanks, Becky! I love the way the black and white patterned paper looks clean while the embellishments really pop off the page!
We'll be back tomorrow with a banner from Debbie!
Andi
This weeks starts our DT February Project reveals and the February Challenges. February's assignment was to create a banner - any type of banner - and our team did not disappoint!
Michelle's February project is going to be published in July's CREATE Magazine! Yay, Michelle! It is a chandelier inspired framed wall hanging in the style of a banner.
![]() |
| Framed Chandelier Wall Hanging |
Today Becky will be sharing her banner - so take it away, Becky!
Supply List:
Doodlebug Classic Collection - Elegance Paper
Doodlebug Classic Collection - Cascading Floral Paper
Black and White Cardstock
Doodlebug Colorwheel Cardstock Stickers
Purple and Black Ribbon
Black Glitter
We R Memory Keepers Sew Ribbon Tool
Cricut "Sophisticated" Cartridge
Since the new year, I have seen several pictures of people's craft rooms, giving examples of how to organize just as Pages did last month. Amongst all of the great tips, I also noticed how nicely people had decorated their crafty space. So for my banner project I decided to make a "CREATE" banner to eventually hang above my scrap desk.
I started by cutting white 4 1/2" x 6" inch rectangles and 4 1/4" x 5 3/4" rectangles from the patterned paper. I then cut triangles from the bottom of the rectangles to form my flags. I used my Sew Ribbon to cut notches to be able to thread the flags together. Using my Cricut, I cut my title and circles to mat the letters. Usually I am not a fan of using glitter but I wanted an elegant, blingy look so I glittered my title with black glitter. I finished my banner by embellishing with the Doodlebug Cardstock Stickers, which provided the perfect pops of color!
Thanks, Becky! I love the way the black and white patterned paper looks clean while the embellishments really pop off the page!
We'll be back tomorrow with a banner from Debbie!
Andi
Friday, January 20, 2012
Design Team Crop
Hello!
Tomorrow is our first ever Design Team Crop! There's still room for you to join us! It's a great opportunity to work on projects, meet the ladies on the team, talk about techniques and tips and eat yummy food!
{Becky}
{Debbie}
{Lauren}
{Michelle}
{Andi}
We'll all be there to answer questions, demonstrate our favorite techniques, talk about our favorite Design Team projects and share any crafting knowledge that we've acquired!
Here's some of the favorite DT projects...
{Becky's "Thankful" Topiary}
{Debbie's Christmas Banner}
{Lauren's Christmas Projects}
{Michelle's Amazing Suitcase Album}
{Andi's Authentique Carousel}
The DT Crop is this Saturday, January 21st from 1 pm - 9 pm and the cost is $15, which included dinner, snacks and desert! Call Page's to reserve your spot today!
Have a great Friday!
Andi
Monday, September 19, 2011
Christmas in September!
Hello!
We're back today with a Christmas layout from Design Team member, Debbie! Let's hear what Debbie had to say about her project!
We see you tomorrow with the flower tutorial!
Have a great start to your week!
Andi
We're back today with a Christmas layout from Design Team member, Debbie! Let's hear what Debbie had to say about her project!
This month's project was such a fun layout because of the Authentique Christmas line. It is such a beautiful collection and I found it to be perfect for some pictures that I have been wanting to scrap and was waiting for the perfect paper. I used the Yearning, Expectation, Curiosity and Awe. I also used a sketch from Scrapbook Generations. My title was done using the Vixen die set from Quikutz. For my embellishments I made Box Flowers which I had seen in a Creating Keepsakes magazine.
Here's a close up of Debbie's Box Flower. We'll be sharing a tutorial on this technique tomorrow!
We see you tomorrow with the flower tutorial!
Have a great start to your week!
Andi
Thursday, September 15, 2011
Thursday Tutorial with Christina!
Hello! Here is a GREAT tutorial from Christina! You'll be running to get your embossing powder, pigment ink, stamp and any/all of your acrylic pieces to give it a shot!
This month I will show you how to add a dimensional layer onto a clear plastic embellishment! This gives a subtle, etched look on an otherwise plain, flat surface. First, you need a “Fragments” embellishment from Tim Holtz, which is simply a clear plastic charm.
Using a medium-grit sandpaper, sand only one side of the charm to give it a frosted look.
Take a stamp you’d like to use (I used one of mini dots for my project, but flourishes look really great!) and apply an embossing ink pad (I used a bottle of embossing liquid).
Press the design onto the sanded side of the charm (or press the charm onto the stamp!)
Add clear embossing powder until it is completely coated. Remove the excess (this may be poured back into the jar for re-use) by tapping on the opposite side several times.
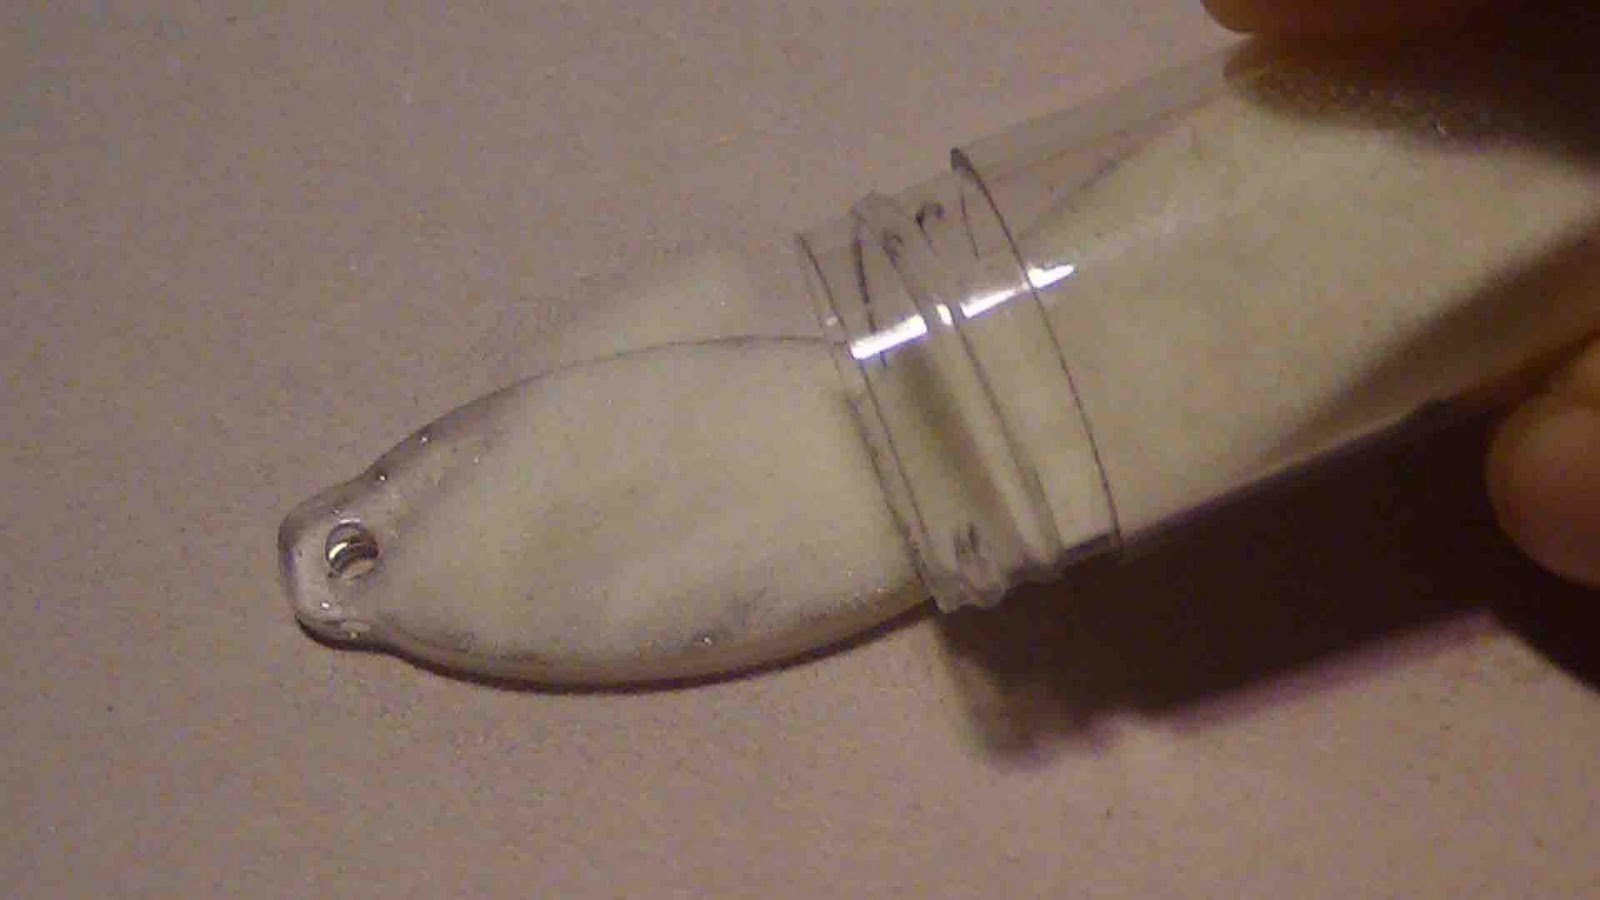
Melt the embossing powder using a heat gun, careful to only heat it for only seconds at a time because the plastic charm will melt! So let it cool repeatedly before continuing, but keep applying heat until all the powder has melted. This is what created the clear design onto the scratched surface. Think of it as removing a design (your stamped image) from a frosted surface.
I simply added stickers and ribbon.... but you can do many things to it! Add a solid or patterned paper (stick to the embossed side) or color the charm’s embossed side with a stamp pad or a variety of other inks. NOTE: You can also use those frosted glass slides for this method and skip step 2 - this makes beautiful charms for jewelry!!)
That's it, thanks Christina! I hope that you give this a try, I think this is a great tutorial and out of the box - errr - plastic!
See you back here tomorrow!
Andi
This month I will show you how to add a dimensional layer onto a clear plastic embellishment! This gives a subtle, etched look on an otherwise plain, flat surface. First, you need a “Fragments” embellishment from Tim Holtz, which is simply a clear plastic charm.
Using a medium-grit sandpaper, sand only one side of the charm to give it a frosted look.
Take a stamp you’d like to use (I used one of mini dots for my project, but flourishes look really great!) and apply an embossing ink pad (I used a bottle of embossing liquid).
Press the design onto the sanded side of the charm (or press the charm onto the stamp!)
Add clear embossing powder until it is completely coated. Remove the excess (this may be poured back into the jar for re-use) by tapping on the opposite side several times.
Melt the embossing powder using a heat gun, careful to only heat it for only seconds at a time because the plastic charm will melt! So let it cool repeatedly before continuing, but keep applying heat until all the powder has melted. This is what created the clear design onto the scratched surface. Think of it as removing a design (your stamped image) from a frosted surface.
I simply added stickers and ribbon.... but you can do many things to it! Add a solid or patterned paper (stick to the embossed side) or color the charm’s embossed side with a stamp pad or a variety of other inks. NOTE: You can also use those frosted glass slides for this method and skip step 2 - this makes beautiful charms for jewelry!!)
That's it, thanks Christina! I hope that you give this a try, I think this is a great tutorial and out of the box - errr - plastic!
See you back here tomorrow!
Andi
Wednesday, September 14, 2011
Back to School with Christina!
Christina had Fancy Pant's new line, "Off to School", which has great colors, patterned papers and embellishments to choose from! Fancy Pants has even come out with actual chalk board stickers - isn't that the best? I think that's so cool! Take a look at some of their products.
Let's hear from Christina about her layout!
Most of you are getting your kids back into the rhythm of school days. So while they are in class, it’s time for you to start scrapping! What better way to kickstart the memories of a new school year than by documenting a child’s first days back? Fancy Pants has come out with an adorable line called “Off to School” that fits any grade level. I love the bold, muted versions of the “basic”colors you think of in elementary school, with really fun patterns like pencils, drawn stars, and grids. I think the best part is that it’s perfectly suited for boys, which can be hard to come by! I hope you enjoy creating with this line as much as I did!
We'll be back tomorrow with a great tutorial using plastic pieces, embossing powder and a stamp!
See you then!
Andi
Monday, September 12, 2011
We're laying it all out for you!
This months Design Team assignments were to work on a 2 page layout - our hope is to inspire you to scrap your summer memories!
I'll be sharing my layout with you today, I used the Farm House line from Crate Paper for a school layout and I love the way it turned out! Take a look!
I used Glimmer Mists on the white space on the page, but instead of spraying it I took the sprayer out and just used the tube of the sprayer to drop the mist on the page. I also detail cut different labels from the paper for the top left corner, I choose the California label since that's where we live and the Apple label since it's a school layout. I used rub-on's from Foof-a-la, Pink Paislee and October Afternoon.
I'll be sharing my layout with you today, I used the Farm House line from Crate Paper for a school layout and I love the way it turned out! Take a look!
I used the Farm House line for Adam's first day of preschool - which might not be an obvious choice but it turned out perfectly! Here's some close ups!
The little flash cards are hand cut from the Graphic45 ABC Collection line, which turned out so cute!
I used Glimmer Mists on the white space on the page, but instead of spraying it I took the sprayer out and just used the tube of the sprayer to drop the mist on the page. I also detail cut different labels from the paper for the top left corner, I choose the California label since that's where we live and the Apple label since it's a school layout. I used rub-on's from Foof-a-la, Pink Paislee and October Afternoon.
I used either rub-on numbers or sticker numbers for each picture on the right page. I then journaled what was happening in each picture and matched them up with the numbers.
I used a lot of the sticker elements from the line, including this cute little flag, tag and "welcome" label.
That's it for me today! I hope you enjoyed my layouts and are inspired to use paper that might now be an obvious choice! Please check out my blog to see more of my projects!
I'll be back tomorrow to share a flag tutorial! Flags are super trendy right now and so easy to make!
See you tomorrow!
Andi
Subscribe to:
Posts (Atom)