to our Page's Design Team for all of your inspiring projects! We're through with this month's projects, but remember to check back in (either Saturday os Sunday) to see what the next Page's Peep's Challenge is and I really hope that you'll be inspired to join in! Remember, if your project is chosen, you'll receive a fun prize from Page's and bragging rights! Do you want a hint of the next challenge? Okay, all of our city layouts are based on this.... and crops too... does that help at all? It's a pretty popular trend right now in papercrafting...
And, if you're looking to stay inspired, please remember to check out our team member's personal blogs. Here's links to all of them:
Michelle McClure
Debbie Lacey
Andrea Yokley-Jessup
Francine Vorbeck
We'll see you at the end of the week!
Andi

Pages From the Heart
Tuesday, June 28, 2011
Monday, June 27, 2011
A card from Michelle
Hello!
I hope that everyone had a great weekend, got a little bit of crafting in along with your normal happenings! So now let's start off the week with a little inspiration from Michelle; here's another project using MyMindsEye's Fly a Kit paper!
Happy go Lucky Card:
![]()
This is a card based on a Got Sketch card #117 sketch which you can find here: http://gotsketch.blogspot.com/2011/05/sketch-117-card.html
I cut out a cloud shape from a piece of scratch paper, using the negative space, I dabbed some white ink and made some cloud patterns on blue cardstock. I cut out a kite from the patterned paper and popped it up. I made a tail from wired cording and baker's twine.
![]()
![]()
Thanks, Michelle! And remember to stop in at Pages to see this card in person so you can really see all of the details!
A little bit of news - We'll be announcing our monthly challenge for your, our viewers, so keep checking in! I'm also holding off on the yo-yo tutorial for a little bit - but don't worry, we will be doing a tutorial in the near future AND it'll be from someone special that you all will remember from a past Page's post... do you have an idea of who I'm talking about???
We'll see you all later!
Andi
I hope that everyone had a great weekend, got a little bit of crafting in along with your normal happenings! So now let's start off the week with a little inspiration from Michelle; here's another project using MyMindsEye's Fly a Kit paper!
Happy go Lucky Card:

This is a card based on a Got Sketch card #117 sketch which you can find here: http://gotsketch.blogspot.com/2011/05/sketch-117-card.html
I cut out a cloud shape from a piece of scratch paper, using the negative space, I dabbed some white ink and made some cloud patterns on blue cardstock. I cut out a kite from the patterned paper and popped it up. I made a tail from wired cording and baker's twine.


Thanks, Michelle! And remember to stop in at Pages to see this card in person so you can really see all of the details!
A little bit of news - We'll be announcing our monthly challenge for your, our viewers, so keep checking in! I'm also holding off on the yo-yo tutorial for a little bit - but don't worry, we will be doing a tutorial in the near future AND it'll be from someone special that you all will remember from a past Page's post... do you have an idea of who I'm talking about???
We'll see you all later!
Andi
Friday, June 24, 2011
Single? Or looking?
I know I am! Looking at Michelle's single page layout, that is! Was that too lame? I know, I know, it was but I do love some cheesiness in my day. Anyway, back to Michelle's layout - she did some great stitching around the perimeter of the layout along with a fun 3-D effect on the stars and the life preserver is hand made! Take a look!
![]()

Here's what Michelle had to say about her layout:
At the Beach one page layout:
I punched out the stars in the LimeTwist collection and arranged the circles as my background piece. I felt the white circles on white cardstock did not pop so I added the orange to show off the multi-colored stars. I also randomly popped up some of the stars for some surprise dimension. I wanted another embellishment that wasn't a star so I layered different sizes of circles plus some wired cording to create a life preserver that matched a beach theme. I paired these photos with this collection because the colors of the buoys perfectly matched the bright colors of the papers. I hand stitched around the layout to create a thin border that wouldn't compete with the busyness of the star pattern. This is based on Allison Davis' One Page Sketch #1 which you can download and use here: http://www.sketchsupport.com/p/one-page-sketches.html
Thanks, Michelle! This layout is great and totally inspired! I love how Michelle "made" the paper that she wanted - hopefully you'll think outside the box the next time you want something that doesn't really exist - just think about this layout and create your own!
We'll see you on Monday! Hope you're feeling crafty this weekend!
Andi
Thursday, June 23, 2011
A super cute Mini-album from Christina!
Hello! Good morning!
Today we're going to look at a great mini-album that Christina made! This album is super cute - the papers are very fun, perfect for a little summer book and the album it's self is very cool to look at. Christina used a pre-made album, but if you go into the store to take a look at the album, I'm sure that you'll be able to figure out how to create your own! It's a pretty easy accordion fold album and you just need to alternate your placement of the different pages. Okay, enough yakking from me, let's take a look!
See what I mean? Isn't it fun and cute? I love this album. Christina used the different journaling stickers, flowers, tags, tabs, bees, lady bugs, ribbon, dies, twine... so much to make this book amazing! Here's a better look at each of the pages.
See what I mean? Isn't it fantastic? You could do this same concept but with a different paper to change your theme/look completely.
Thanks, Christina, for this fantastic album!
We'll see you all tomorrow for either another project OR the yo-yo tutorial!
Andi
Today we're going to look at a great mini-album that Christina made! This album is super cute - the papers are very fun, perfect for a little summer book and the album it's self is very cool to look at. Christina used a pre-made album, but if you go into the store to take a look at the album, I'm sure that you'll be able to figure out how to create your own! It's a pretty easy accordion fold album and you just need to alternate your placement of the different pages. Okay, enough yakking from me, let's take a look!
 |
| Album Front |
 |
| Album Open |
 |
| Pages 1 & 2 |
 |
| Pages 3 & 4 |
 |
| Pages 5 & 6 |
 |
| Pages 7 & 8 |
 |
| View of Mini from back |
Thanks, Christina, for this fantastic album!
We'll see you all tomorrow for either another project OR the yo-yo tutorial!
Andi
Wednesday, June 22, 2011
A treat from Michelle
Hello!
Sorry for the late post! Today we're going to share a fun little project by Michelle - it's a treat holder! This is great for a party favor or a little teacher or coach gift. Let's take a look!
![]() Isn't it cute! Here's what Michelle had to say about it:
Isn't it cute! Here's what Michelle had to say about it:
![]()
![]()
Sorry for the late post! Today we're going to share a fun little project by Michelle - it's a treat holder! This is great for a party favor or a little teacher or coach gift. Let's take a look!

This is a little 2.5" wide treat holder. I put some candy inside, but you can put in anything that will match your theme. You can change up the papers and use it for weddings or birthdays or showers as a favor holder. It is basically a rectangular piece of paper you fold and connect with Velcro. It is simple and sweet.
Here's a few other views.

The more I think about this, you could even stand it up on one of it's ends, use one side of the box as a "menu" display or name card, put a picture on the other side and then make the front & goodie match your theme - this would add a lot to any plate setting without a lot of cost!
Thanks so much, Michelle! Again, to have step-by-step instructions, stop into Page's and grab one of Michelle's news letters!
We'll see you tomorrow... hopefully a little earlier in the day!
Andi
Tuesday, June 21, 2011
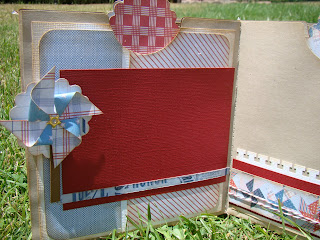
Double the fun... double the layout?
Okay, we'll it's not actually double layouts, but a double 12"x12" page layout made by me. This is my last project to share this month, but don't worry, we have so much more from the rest of the design team!
Sew, for part of the DT projects, we had to sew on one of our projects. I decided to sew with my sewing machine on my page, at first I was just going to sew around the border of my layout, but then something made me thing about using the stitching as part of my design. Here's the sketch from Sketch Support that I used for my inspiration. You can click here to go to Sketch Supports website.
![]()
![]()
![]()
![]()
![]()
![]()
![]()
![]()
![]() So that's it. I love the way the fireworks turned out and I love experimenting with the sewing aspect of the projects.
So that's it. I love the way the fireworks turned out and I love experimenting with the sewing aspect of the projects.
I know that I said I'd do the yo-yo tutorial today, but I'm going to have to postpone for a few more days - sorry!
Stay tuned tomorrow for one of Michelle's projects!
Andi
Sew, for part of the DT projects, we had to sew on one of our projects. I decided to sew with my sewing machine on my page, at first I was just going to sew around the border of my layout, but then something made me thing about using the stitching as part of my design. Here's the sketch from Sketch Support that I used for my inspiration. You can click here to go to Sketch Supports website.

And here's my interpretation of the sketch.

I decided to make the "flowers" into stitched fireworks. I drew the lines for the fireworks with disappearing ink, then stitched over the lines. Once I was done stitching, I added the rhinestones for the sparkly effects. Here's a few close-ups.


I used a zig-zag stitch across the top of my banner, added buttons on the bottom of each of the banners. I used the pre-made die cuts instead of creating my own title and popped them up with foam tape. On the next page I decided to trade one of the picture spots for a pocket where I used more die cuts as journaling spots. I sewed the pocket onto the page and then covered the front of it with a picture. Here's a few closeups of this page.


I know that I said I'd do the yo-yo tutorial today, but I'm going to have to postpone for a few more days - sorry!
Stay tuned tomorrow for one of Michelle's projects!
Andi
Monday, June 20, 2011
AUTHENTIQUE is on it's way!


Have you heard? A new paper company has managed to win our hearts. We can't wait to show off these great new products (not to mention that we are the first in our area to have this ). Be sure to check back often to find out when it arrives in our store. It will be flying out the door!
Monday Morning with Michelle!
Hello!
I hope that you all had a great weekend and that everyone celebrated Father's Day just the way you wanted to! We have an exciting week of design team projects to share, so let's get started with Michelle's Little Boy mini-album!
This little album folds flat into a 4 x 4" square but then expands out into an accordion album with multiple pockets, tags and doors. This album is great, I love the little pages between the larger pages, there's so much room for pictures and journaling - and the pocket pages with the tags - talk about double duty! The colors in this collection are so much fun, even though they're geared towards a boy, I think they'd be great for summer projects, spring projects, Father's Day... the chevron pattern is my favorite! Let's take a look at a few of the pages a little closer.
![]() Here's Michelle's 1st page in the album. The houndstooth and the chevron patters offer so much eye appeal - and I love the twine running across the page from top to bottom.
Here's Michelle's 1st page in the album. The houndstooth and the chevron patters offer so much eye appeal - and I love the twine running across the page from top to bottom.
![]() Here's one of the tag pocket pages. The torn paper border punch is great and adds a little bit of fun without being girly. The journaling tag, clusters of stars and the little title are great and really make the page pop!
Here's one of the tag pocket pages. The torn paper border punch is great and adds a little bit of fun without being girly. The journaling tag, clusters of stars and the little title are great and really make the page pop!
Come on into Page's and get Michelle's full instructions - she gives you step-by-step instructions and links to websites where she found her instructions and inspiration!
I'll be back tomorrow with the tutorial on the paper yo-yos!
Andi
I hope that you all had a great weekend and that everyone celebrated Father's Day just the way you wanted to! We have an exciting week of design team projects to share, so let's get started with Michelle's Little Boy mini-album!
 |
| Michelle's Mini-Album using Fly a Kite |
 |
| Michelle's mini - opened! |


Come on into Page's and get Michelle's full instructions - she gives you step-by-step instructions and links to websites where she found her instructions and inspiration!
I'll be back tomorrow with the tutorial on the paper yo-yos!
Andi
Friday, June 17, 2011
It's Debbie's turn again!
Hello!
What did you think about the first week of the latest DT projects? We hope that you're feeling inspired and thinking about all your upcoming events and what you can use to make them extra special!
We're going to share Debbie's mini-album. If you'll remember, Debbie had the October Afternoon 5&Dime paper line, which is super cute! Let's see how Debbie used her paper to create a mini-album!
![]()
![]()
![]()
![]()
![]() This album is a great example of how you can showcase something extra special besides doing a typical page layout for it! These little albums would be great on a coffee table or you could even give them to a hostess as a little "Thank You!" gift! Debbie used binder rings to keep her pages together - what a clever and inexpensive why to create a special album!
This album is a great example of how you can showcase something extra special besides doing a typical page layout for it! These little albums would be great on a coffee table or you could even give them to a hostess as a little "Thank You!" gift! Debbie used binder rings to keep her pages together - what a clever and inexpensive why to create a special album!
Thanks so much, Debbie, for your awesome and inspiring mini! If you would like to see more of Debbie's work, please click here to see her blog!
Well, we hope that everyone has a great weekend. And, I just wanted to leave you with a few cards that might inspire you to create your own Father's Day card for that special guy in your life! Take a look!
To see more and get a better idea of how these cards were made, you can check out my blog by clicking here. Remember, you can take a basic layout of a card and just switch out the paper and embellishment for a totally original card! Don't get caught up with the idea of something being identical, making it your own will guarantee that you're getting exactly what you want!
See you all Monday!
Andi
What did you think about the first week of the latest DT projects? We hope that you're feeling inspired and thinking about all your upcoming events and what you can use to make them extra special!
We're going to share Debbie's mini-album. If you'll remember, Debbie had the October Afternoon 5&Dime paper line, which is super cute! Let's see how Debbie used her paper to create a mini-album!


I love how she turned the star's into flowers!


Thanks so much, Debbie, for your awesome and inspiring mini! If you would like to see more of Debbie's work, please click here to see her blog!
Well, we hope that everyone has a great weekend. And, I just wanted to leave you with a few cards that might inspire you to create your own Father's Day card for that special guy in your life! Take a look!
 |
| Macho Men have Mustaches Card |
 |
You're a classic, Dad Card |
See you all Monday!
Andi
Thursday, June 16, 2011
Graphic 45 "Wizard of Oz"
"Sew" happy to see Christina's project!
Hello, friends!
Today we're going to take a look at Christina's page layout - which is sew cute!
I really really really like "white" space on a layout, and Christina is great at using white space! She also used the Bazzill "In Stitch'z" line of sewing templates and floss. Take a look at Bazzill's line.


Today we're going to take a look at Christina's page layout - which is sew cute!
I really really really like "white" space on a layout, and Christina is great at using white space! She also used the Bazzill "In Stitch'z" line of sewing templates and floss. Take a look at Bazzill's line.
 |
| Granny Stitchz Template |
 |
| Piercing Pad |
 |
| Bazzill Needles |
 |
| Bazzill Thread |
And if you like the Granny Template, you should take a look at all of the different templates they offer! They have everything from flower templates to letter templates!
Okay, enough about Bazzill, let's look at Christina's layout!

Aren't the stitches awesome! And the "Girl" title stitching adds so much! Christina's paperline was from Doodlebug, itsn't it perfectly sweet for the picture? And I love how she used the sticker tag and the sticker border. The button with the ribbon tied to it adds just the right amount of umph! I love how no one embellishment overshadows another, but how they all work so well together to create an eye catching and appealing page.
Take a closer look at the stitching.

Please come into the store to see the layout in person. You can also get a better idea of Bazzill's In Stitchz when you come in!
We'll see you tomorrow! And don't forget, Sunday is Father's Day... have you made your cards yet? gotten your paper to create the perfect layout for the fun day ahead?
Andi
Wednesday, June 15, 2011
We have "mini" more to share...
Mini albums, that is! Today is my turn to share... and I'm very excited because I really enjoyed using My Minds Eye American Made line - I love the colors, the vintage feel, the patterns - it's all awesome! The best part of this paper line is that I really, honestly feel like it can be used for way more than a 4th of July themed project. You can use this for vintage inspired projects, a summer layout, old pictures... I used this same paper line for a fun, vintage inspired sewing card! You can take a look at the card here. Anyways - here's a few pictures of the paper line -


 This page was inspired by the pictures that I'll put in the book of my son's first 4th of July - he was only a few months old but was amazed by a simple pinwheel and American Flag, so I knew that I had to create a pinwheel in my book to remind me of the joy he found in something so simple.


The paper is great, you really need to take a look in person to appreciate it! Okay, onto my mini-album. I used a VERY old Making Memories book insert for my actual book. Each page is a pocket - so you get twice as many pages! Take a look.

I used a few different patterns from the paper pack, but then I took a strip of denim and sewed it into a ruffle, which is very simple. You just do a based stitch and then pull it so that the fabric ruffles. I glued it onto album with scrappy glue and added a few buttons just for fun.

I used simple layouts for all of my pages, I let the paper do the work for me!


This page's embellishment is a mixture of supplies. I used a Jillibean journaling sprout to create a "Gods Eye". I then took a smaller journaling sprout and stamped the "4th" on it (this is a WeR Clear Stamp which is about $1). I popped it up so you'd still be able to see the twine on the bottom journaling sprout. I LOVE this - the God's eye is so easy and cheap to make, a little bakers twine and a scalloped circle and you're ready to go!
Please head on down to the store to see all the pages in the book - it might just inspire you to do something to celebrate the 4th of July in a big way just so you can use the fun paper!
If you'd like to see more of my projects, please check out my blog here.
We'll see you tomorrow with a beautiful layout created by Christina, I know that you'll really enjoy seeing how she incorporated the sewing challenge into her project - I know I did!
Andi
Subscribe to:
Posts (Atom)