
Pages From the Heart
Tuesday, January 31, 2012
Taylor's Class
Taylor's class this Friday is sold out! However, she will be bringing lots of goodies from her Taylored Expression store, so you can still stop by, shop and say "Hi"! I've heard that she will be bringing her "sweet little one, Madelyn" too!
Friday, January 27, 2012
Basic Grey Page Layout Kit Club
BASIC GREY’S PAGE OF THE MONTH CLUB
We are taking sign ups for our fourth year of Basic Grey’s Page of the Month Club which will begin March 12th.
The POTM class kit gives you enough products, so that you can create one double-page layout every month using the newest papers from Basic Grey paired with classic embellishments. They are very generous with their kits and we can guarantee that you will have leftovers to use on additional page layouts, cards, or any other paper project!
Every month’s project has a different theme to choose from, with different journaling prompts so you can scrap about whatever you want—and let your imagination and creativity soar. And only the newest Basic Grey papers and embellishments will be used in the kits. The Page of the Month kit includes the supplies needed plus…Layout sketches, and easy to follow color instructions. You can complete your kit at home or we have scheduled the 2nd Monday of every month beginning in March to work together. The cost is only $25 per month and requires a year’s commitment. This is perfect for beginners that aren’t sure where to begin, as well as seasoned scrappers that like to know that they will complete one layout a month!
You may sign up by calling the shop, 626 358 5334 or responding to this email.
Looking forward to another great year with Basic Grey!!
Tuesday, January 24, 2012
2 New Collections

Friday, January 20, 2012
Design Team Crop
Hello!
Tomorrow is our first ever Design Team Crop! There's still room for you to join us! It's a great opportunity to work on projects, meet the ladies on the team, talk about techniques and tips and eat yummy food!


Tomorrow is our first ever Design Team Crop! There's still room for you to join us! It's a great opportunity to work on projects, meet the ladies on the team, talk about techniques and tips and eat yummy food!

{Becky}

{Debbie}

{Lauren}
{Michelle}

{Andi}
We'll all be there to answer questions, demonstrate our favorite techniques, talk about our favorite Design Team projects and share any crafting knowledge that we've acquired!
Here's some of the favorite DT projects...

{Becky's "Thankful" Topiary}

{Debbie's Christmas Banner}

{Lauren's Christmas Projects}

{Michelle's Amazing Suitcase Album}

{Andi's Authentique Carousel}
The DT Crop is this Saturday, January 21st from 1 pm - 9 pm and the cost is $15, which included dinner, snacks and desert! Call Page's to reserve your spot today!
Have a great Friday!
Andi
Monday, January 16, 2012
Upcoming Classes

Valentine Banner - The "My Valentine" sheet of We R Memory Keeper's new Valentine collection was the inspiration for Debbie's banner featuring a 12" wrought iron heart hanger. Each panel is framed with a scalloped border or a mat - or both. Hand-cut banner and tag elements from the "My Valentine" sheet are popped up with pop-dots. Origami hearts, fan-folded bejeweled circles, hand-cut love birds and a coordinating tag hang on twine from each flag. A bit of tulle tied with a ribbon and a hanging tag finish off the Valentine hanger.
Teacher – Debbie Cost $28.00
Thursday, January 26th 7:00pm – 9:00pm

Valentine Torn Paper Media - Elizabeth Elizabeth Elizabeth
Teacher – Elizabeth Cost $38.00
Wednesday, February 1st 6:30pm – 9:30pm
Sunday, January 15, 2012
Day 2 of the January Challenge
Hello!
We're back this morning with the MORE organization tips and storage ideas!!
Today I'm sharing my "Craftopia", which my husband put together almost entirely from reused items!
 The Craftopia sits in the playroom - I tried working exclusively in my office, but with a little guy, this wasn't possible. I constantly had a visitor who was getting into my stuff or begging me to go watch him play... so, I moved a folding table into the playroom was kept running into a mess, moving items from my office to the playroom...

 On one side I house all of my commonly used papercrafting supplies in misc baskets and containers. I also have a bakers rack that stands behind the table that has more baskets for storage. The other side holds my sewing notions and fabric. It's a great way to reuse something and have a space of my own in Adam's playroom.
And last, I wanted to share an organization tip that I've used for a long time! It helps me create cards in the blink of an eye!

We're back this morning with the MORE organization tips and storage ideas!!
Today I'm sharing my "Craftopia", which my husband put together almost entirely from reused items!

My husband found 2 discarded wall mounting shelving units in a trash bin one day there were in perfectly good condition, just a little scratched and missing doors - they looked a little like this.

We didn't know what we were going to do with them, just that they were too good to pass up. We were playing with them one night, trying to decide where to put them in the house when my husband put them back to back and the Craftopia was born! He sanded them both down, filled in the holes where the hardware used to be and painted them white. We tried to antique them, but they ended up just looking dirty so we left them white. We put rolling casters on the bottom and a plywood sheet on the top for the table. To make it look a little nicer we put a thin strip of molding around the table top. I added a LARGE cutting mat (since I use it to papercraft and sew) to the table top which covers the majority of it.

And last, I wanted to share an organization tip that I've used for a long time! It helps me create cards in the blink of an eye!

Whenever I've put together a page layout or a mini-album or even a card, I put all of the scraps together in a a large Ziploc bag and set it aside. When I need to make a quick card I grab a Ziploc bag full of scraps that I already know go together and throw a card together! Most of the scraps are different sized so I don't even have to do that much cutting!
That's it for the January Challenge this month! Remember, you can participate by emailing a picture and an explanation of your favorite or best storage/organization tip or technique! Email me at ayokleyjessup@gmail.com with "January Challenge" in the subject!
And don't forget about the Design Team Sponsored Crop on January 21st! Come down to Page's, eat yummy food and get to know the team! Call the store to reserve your spot today!
Andi
Saturday, January 14, 2012
January Challenge!
Hello!
I hope that you found some inspiration in the Design Team's projects from this month! There's nothing like starting the new year fresh and inspired to continue with or start papercrafts!
I don't know about you, but one of my "goals" - I don't do resolutions! - is to be more organized in 2012. I want to be able to find the "the little man that sits in the green tractor with the scoop and yellow letters" that my little boy asks for or my 7/8 circle punch along with my 1 1/4 circle punch that I NEED to use together on a project! So, to help keep you inspired with the New Year, we've decided to do a different type of Challenge this month!
Instead of our typical Challenge, we asked the Design Team to share any organizational tips or products that they feel might be helpful! We'll be sharing all of them this weekend in hopes that you'll feel inspired to organize your crafting space so you feel more productive and inspired!
Let's start off with a storage idea from Becky!
I will be completely honest here. When I saw that the upcoming challenge had to do with organization, I kind of panicked. My husband even laughed a little (he quickly covered it up) when I told him I had to give examples of how to organize the chaos that is my craft area. After a few weeks of, "What on Earth am I going to do?" I finally pulled it together. I decided to tackle some of my biggest problem areas for this challenge: ribbon, punches, and small embellishments.
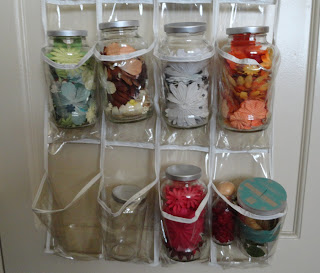
The small embellishments and ribbons came together over a few evenings. A friend of mine was getting rid of some small fixtures and I asked if I could take a couple. I had purchased a package of small plastic bottles and the shelves were the perfect size for them. My best friend happened to be over as I was working on this and since she loves to organize, she got involved too. She brought me some baby food jars and I spray painted all of the lids silver. Then we got to sorting ALL of my small embellishments. I had no idea how much space all of that packaging was taking up! Then a different friend gave me some quart sized mason jars which were perfect for the ribbon!

Next were the punches. I had an old, over the door shoe rack that I wasn't using so I hung it over the back of a door close to my desk and put all of my punches in the slots. I had also been saving spaghetti sauce jars (poor husband didn't realize why we had been eating so much spaghetti lately) which were perfect, after I spray painted the lids, for holding flowers. I had originally wanted the jars for ribbon but the opening was too small.

Although it took a lot of work, I am so happy that my craft area is beginning to look somewhat organized. I'm hoping that if my stash is easily accessible and in sight that I will actually begin to use some of it. So thank you for making me get to work!
And now let's hear from Debbie on what she uses to organize her paper!
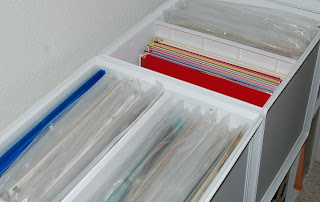
I like to buy patterned paper and coordinating cardstock at the same time, even if I don't have a specific project in mind. I store the "set" together in a 12x12 clear envelope that closes with a snap or button/string....or even the clear cellophane bag that Pages from the Heart uses for purchases.

The paper packs fit perfectly in ITSO storage cubes from Target. I turned the top two cubes on their sides and used a shelf as a divider so the packs would stand upright. The units also come in bright pink and black. You'll find them near the Rubbermaid/Sterlite storage bins at Target. The large cubes are $9.99 each and the fabric bins and shelf dividers are even less....they are often on sale.
And last, I wanted to share some of my office organization.
 When we bought our home a few years I designed my office with a few goals in mind:
- to organize my office inexpensively
- to have my commonly used supplies easily accessible
So, I went to Ikea and found great storage solutions in their kitchen area! It was much less expensive than buying craft organizational items.

 The trays I use for my adhesives, mists, Stickles and Re-inkers. The basket is for little items that can't really stand on their own - and I used binder clips to hang some of my QK dies that don't fit in the QK Storage Binders from the basket.
In another part of my office, my husband made a Die Cut Center for me. He made a half table and attached it to the wall and the built-ins. The table houses my large paper trimmer and Epic while the shelves immediately above the table have my dies and accessories.

We'll be back tomorrow with more great ideas and tips!
And here's how you can participate! Please email me at ayokleyjessup@gmail.com any tips or organization products that you use along with an explanation! That's it! The Challenge will end at midnight on Saturday, January 21! The winner will receive a goody bag full of product from Page's!
And, if you want to meet the Design Team, please join us at the first ever Design Team Crop taking place January 21 from 1-9! We'll have snacks, dinner and a great make-n-take for everyone that participates! We can't wait to meet everyone! Please call the store to make your reservation!
Thanks so much!
Andi
I hope that you found some inspiration in the Design Team's projects from this month! There's nothing like starting the new year fresh and inspired to continue with or start papercrafts!
I don't know about you, but one of my "goals" - I don't do resolutions! - is to be more organized in 2012. I want to be able to find the "the little man that sits in the green tractor with the scoop and yellow letters" that my little boy asks for or my 7/8 circle punch along with my 1 1/4 circle punch that I NEED to use together on a project! So, to help keep you inspired with the New Year, we've decided to do a different type of Challenge this month!
Instead of our typical Challenge, we asked the Design Team to share any organizational tips or products that they feel might be helpful! We'll be sharing all of them this weekend in hopes that you'll feel inspired to organize your crafting space so you feel more productive and inspired!
Let's start off with a storage idea from Becky!
I will be completely honest here. When I saw that the upcoming challenge had to do with organization, I kind of panicked. My husband even laughed a little (he quickly covered it up) when I told him I had to give examples of how to organize the chaos that is my craft area. After a few weeks of, "What on Earth am I going to do?" I finally pulled it together. I decided to tackle some of my biggest problem areas for this challenge: ribbon, punches, and small embellishments.
The small embellishments and ribbons came together over a few evenings. A friend of mine was getting rid of some small fixtures and I asked if I could take a couple. I had purchased a package of small plastic bottles and the shelves were the perfect size for them. My best friend happened to be over as I was working on this and since she loves to organize, she got involved too. She brought me some baby food jars and I spray painted all of the lids silver. Then we got to sorting ALL of my small embellishments. I had no idea how much space all of that packaging was taking up! Then a different friend gave me some quart sized mason jars which were perfect for the ribbon!

Next were the punches. I had an old, over the door shoe rack that I wasn't using so I hung it over the back of a door close to my desk and put all of my punches in the slots. I had also been saving spaghetti sauce jars (poor husband didn't realize why we had been eating so much spaghetti lately) which were perfect, after I spray painted the lids, for holding flowers. I had originally wanted the jars for ribbon but the opening was too small.


Although it took a lot of work, I am so happy that my craft area is beginning to look somewhat organized. I'm hoping that if my stash is easily accessible and in sight that I will actually begin to use some of it. So thank you for making me get to work!
And now let's hear from Debbie on what she uses to organize her paper!
I like to buy patterned paper and coordinating cardstock at the same time, even if I don't have a specific project in mind. I store the "set" together in a 12x12 clear envelope that closes with a snap or button/string....or even the clear cellophane bag that Pages from the Heart uses for purchases.

The paper packs fit perfectly in ITSO storage cubes from Target. I turned the top two cubes on their sides and used a shelf as a divider so the packs would stand upright. The units also come in bright pink and black. You'll find them near the Rubbermaid/Sterlite storage bins at Target. The large cubes are $9.99 each and the fabric bins and shelf dividers are even less....they are often on sale.

And last, I wanted to share some of my office organization.

- to organize my office inexpensively
- to have my commonly used supplies easily accessible
So, I went to Ikea and found great storage solutions in their kitchen area! It was much less expensive than buying craft organizational items.


In another part of my office, my husband made a Die Cut Center for me. He made a half table and attached it to the wall and the built-ins. The table houses my large paper trimmer and Epic while the shelves immediately above the table have my dies and accessories.

We'll be back tomorrow with more great ideas and tips!
And here's how you can participate! Please email me at ayokleyjessup@gmail.com any tips or organization products that you use along with an explanation! That's it! The Challenge will end at midnight on Saturday, January 21! The winner will receive a goody bag full of product from Page's!
And, if you want to meet the Design Team, please join us at the first ever Design Team Crop taking place January 21 from 1-9! We'll have snacks, dinner and a great make-n-take for everyone that participates! We can't wait to meet everyone! Please call the store to make your reservation!
Thanks so much!
Andi
Thursday, January 12, 2012
Our last project from Michelle!
Hello!
Today is the final day of January Design Team projects! Let's end with Michelle's beautiful, punch out card!
Authentique Congratulations Card

Supply List for Card
Featured Collection: Authentiques’s “Gathering” Collection
Cardstock: Bazzill Basics
Patterned Papers: Authentique
Stickers: Authentique
Ink: ColorBox Chalk
Pen: Pentel
Brads: Making Memories
Other: I hand cut out the hearts
This is a cute little card made from a base piece of 4 x 12" cardstock. I covered it with a strip of 2 x 12" piece of Authentique's patterned paper and a thin piece of coordinating cardstock. I decorated it with a sticker, a die cut and some brads. The fun part is how you fold this card.

Going from one edge to the other, I folded the card at 2", 4", 8" and 10" marks. I drew in half a heart along the 2" and 10" folds and cut it out, which opened into a whole heart because of the fold. You can try using a punch also.

This is a quick card to make and you can change it up for other occasions, for example Valentine's Day is coming up. You can also change the shape of the cut out, like into a square and make that a present for a birthday card. The possibilities are endless. I like trying out new shapes and folds for cards, so this was a fun departure from the norm.
I love this card and can't wait to try it for a birthday, maybe with a cake or cupcake?
Thank you so much, Michelle!
Please check back in this Saturday - we'll be sharing our January Challenge and asking you to play along!
Have a great remainder of the week!
Andi
Wednesday, January 11, 2012
Lets see Debbie's Layout!
Hello!
Today is Debbie's turn to share a layout that she created of pictures that were take of her daughter on a recent trip to the Botanical Gardens using tips from "Toddler's and Tiara's"... Let's take a look!
Paper Collection:
Authentique "Gathering" collection.

The base is the blue side of the Foundations bi-fold solid paper. I used the solid brown side for matting the picture and the layering at the bottom of the page.
I cut a 4"x12" piece of the "Grow" paper and mounted it with brown cardstock leaving an extra bit of border at the bottom - enough to frame a border of individual words from the "Diction" sheet. There are over 200 words on a single sheet of this product! I also added a scalloped border from the orange/blue side of the "Grow" paper and tied a piece of blue/white ribbon in an off-center bow.
The larger picture is triple-mounted in cream, orange/blue, and brown cardstock and then framed with 5 3/4" and 6" circles cut from the brown/blue and orange/blue patterned paper. A scalloped punchout from the Excerpts sheet and some folded paper petals accent the top of the circle. The petals are made by punching out a 3/4" circle, making an overlapping small fold and then working the edges into a cupped petal shape with your fingers.

The three smaller pictures were printed with larger white borders and cropped down to 3 1/2" squares. Another calendar, framed with the negative from the punchout sheet, has the date of the event highlighted with pearls.
Thanks, Debbie! What a beautiful layout, with a fun batch of pictures!
We'll see you back here tomorrow with a card from Michelle!
Andi
Tuesday, January 10, 2012
Hello!
Today we'll be sharing a card from Becky! It's using the Vintage T Collection that I used in my layout and that Lauren used in her card! Let's see what Becky does with the same collection!
You Rock Card Easel Card

Supply List
We r Memory Keepers Vintage T Collection - Distressed Jeans and Flannel Shirt paper
We r Memory Keepers Vintage T Collection - Embossed Stickers
We r Memory Keepers Vintage T Collection - Jumbo Brads
Coordinating Cardstock
Letter Stickers
Alphabet Stamps

To make this easel card I started with a piece of cardstock cut to 4" x 8" and scored at 2" and 4". I folded at the 4" score and folded the 2" score to create the easel. I attached a 3 3/4" x 3 3/4" square to create the top of the card. I used the brads and popped up the sentiment so that the card would have something to hold it up. You can also use buttons, ribbon, twine, or anything that will create an easel.
Thanks, Becky! A great Easel Card - especially since the inside of the card, which turns into the easel, is decorated! It is such a nice, finished card!
Well see you all back here tomorrow
Andi
Monday, January 9, 2012
It's my turn!
Hello!
Today I'll be sharing my layout, which was inspired by a timeline calendar idea. It is centered around my family's trip on the Metrolink to Olvera Street, where my little guy changed from a 3 year old to a soulful musician.

"Ticket to Ride" Layout
Supplies:
WeRMemoies Vintage T Paperline
Bazzill In'Stitchz Borders Template
White Embroidery Floss
Distress Ink: Brushed Cordury
WeR Stamp
WeR Embossed Cassette Tag
Misc. Buttons, Penny
Fiskars Star Punch
EK Success Circle Punch
Jillibean Luggage Tag
Brown Paper Bag
When I saw the Vintage T Paperline, I immediately thought to a recent Metrolink Train Trip that we'd taken into Olvera Street, LA. I also liked the idea of keeping with the idea of a train schedule, so I mapped out our schedule in the form a time line...


I decided to hand stitch (Bazzill In'Stitchz) my timeline instead of printing one from my computer. I used a brown paper bag to highlight the timeline, I felt that it was rough enough for a masculine page. I also stamped a serged seam from the WeR "You Rock" stamp along the bottom edge of the paper bag. I cut .5" strips of white cardstock and hand wrote my times and what we were doing.

I added punched shapes, buttons and a penny to complete a cluster around the bottom corner of the photos from the timeline. I also added the "You Rock" cassette tag to my cluster.

I used a Jillibean Kraft Travel Tag to back my title and the WeR stickers to spell out the main word on my title.
 I put a half circle, a detail cut cassette and a strip of scraps onto the top left corner just to keep the eye moving in a triangle pattern.
That's it for me! I hope you like my calendar interpretation and feel inspired to try a timeline in one of your layouts! You could do it as a year in review, a month, a week... really anything!
We'll be back tomorrow with a card from Becky!
Andi
Today I'll be sharing my layout, which was inspired by a timeline calendar idea. It is centered around my family's trip on the Metrolink to Olvera Street, where my little guy changed from a 3 year old to a soulful musician.

"Ticket to Ride" Layout
Supplies:
WeRMemoies Vintage T Paperline
Bazzill In'Stitchz Borders Template
White Embroidery Floss
Distress Ink: Brushed Cordury
WeR Stamp
WeR Embossed Cassette Tag
Misc. Buttons, Penny
Fiskars Star Punch
EK Success Circle Punch
Jillibean Luggage Tag
Brown Paper Bag
When I saw the Vintage T Paperline, I immediately thought to a recent Metrolink Train Trip that we'd taken into Olvera Street, LA. I also liked the idea of keeping with the idea of a train schedule, so I mapped out our schedule in the form a time line...


I decided to hand stitch (Bazzill In'Stitchz) my timeline instead of printing one from my computer. I used a brown paper bag to highlight the timeline, I felt that it was rough enough for a masculine page. I also stamped a serged seam from the WeR "You Rock" stamp along the bottom edge of the paper bag. I cut .5" strips of white cardstock and hand wrote my times and what we were doing.

I added punched shapes, buttons and a penny to complete a cluster around the bottom corner of the photos from the timeline. I also added the "You Rock" cassette tag to my cluster.

I used a Jillibean Kraft Travel Tag to back my title and the WeR stickers to spell out the main word on my title.

That's it for me! I hope you like my calendar interpretation and feel inspired to try a timeline in one of your layouts! You could do it as a year in review, a month, a week... really anything!
We'll be back tomorrow with a card from Becky!
Andi
Friday, January 6, 2012
A great Boy Card from Lauren!
Hello!
I hope that you're feeling inspired to get out your stash of papercrafting supplies and kick off the New Year with new projects galore!
I was excited to see Lauren's card because it's a BOY card! I love seeing great boyish cards because, for me, they're challenging. My usual tricks of adding bling, ribbons and cute stuff to the card just doesnt' quite work for a boy/guy card. Let's see what Lauren created.
 Supplies & Tools
12 x 12 cream colored card stock
Vintage-T Argyle sweater designer paper by We R Memory Keepers
Legit Griffindor tag
Cream ribbon
Edge distresser
Happy birthday stamp
Black ink
Maroon, creamy brown and navy blue chalk ink
White pigment ink pen
Dimensionals
Glue
Paper cutter
Score buddy
Razor blade
Ruler


I think We R memory keepers Vintage-T line is great for that preteen to early teenage boy. Using their products, I created a gift card holder and birthday card to give to that growing boy. I wanted to do something nontraditional so I scored a 12 x 5.5 sheet of card stock so that there are two flaps to open and used a strip of paper and ribbon to keep the card closed.


Thanks, Lauren!
This is a great boy-ish card with just enough to keep it interesting without making it overdone or girlish!
We'll see you all back here on Monday with another Layout idea!
Andi
I hope that you're feeling inspired to get out your stash of papercrafting supplies and kick off the New Year with new projects galore!
I was excited to see Lauren's card because it's a BOY card! I love seeing great boyish cards because, for me, they're challenging. My usual tricks of adding bling, ribbons and cute stuff to the card just doesnt' quite work for a boy/guy card. Let's see what Lauren created.

12 x 12 cream colored card stock
Vintage-T Argyle sweater designer paper by We R Memory Keepers
Legit Griffindor tag
Cream ribbon
Edge distresser
Happy birthday stamp
Black ink
Maroon, creamy brown and navy blue chalk ink
White pigment ink pen
Dimensionals
Glue
Paper cutter
Score buddy
Razor blade
Ruler


I think We R memory keepers Vintage-T line is great for that preteen to early teenage boy. Using their products, I created a gift card holder and birthday card to give to that growing boy. I wanted to do something nontraditional so I scored a 12 x 5.5 sheet of card stock so that there are two flaps to open and used a strip of paper and ribbon to keep the card closed.


The card has two slots on the inside to keep the gift card in place. The Griffindor/legit embellishment was a tag that I cut to add more dimension and design to the card. A lot can really be done with this type of design but as it is for a young boy, I wanted to keep it simple and boyish.
Thanks, Lauren!
This is a great boy-ish card with just enough to keep it interesting without making it overdone or girlish!
We'll see you all back here on Monday with another Layout idea!
Andi
Thursday, January 5, 2012
Michelle's Calendar Layout
Hello!
Today we're sharing a calendar layout idea from Michelle - and it might make you a little jealous of where she spent her Holidays! Also, I want to point out that the paperline that Michelle used for her layout is the same that Debbie used for her card... they're so different, it really showcases the unlimited uses for this paper!
"Thanksgiving in Cabo" Layout
Featured Collection: Authentiques’s “Gathering” Collection
Supply List:
Cardstock: Bazzill Basics
Patterned Papers: Authentique
Stickers: Authentique
Alphabet Stickers: Authentique
Ribbon: May Arts
Floss: DMC
Ink: ColorBox Chalk
Dimensional Glaze: Glossy Accents by Inkssentials
Border Punch: EK Success
Strong Liquid Adhesive: Fabri-Tac by Beacon Adhesives
Other: needle, paper piercer, souvenirs (coins, keychain)
Sketch: Allison Davis
This collection was scheduled to be a January release from Authentique but people wanted to use it for their fall and Thanksgiving photos, so they released it early. I also decided to use it for my Thanksgiving photos since the colors between the photos and collection matched perfectly.


A great way to make a summary layout, like for the entire year or in this case a vacation, is to use smaller photos in a grid pattern. I didn't think I'd have time to make a layout per activity for the whole vacation, so by doing this, at least I have something documented of the trip while it was still fresh in my mind. Instead of covering every box with photos, I broke up the grid pattern a bit by replacing some the squares with souvenirs from the trip, a die cut, the title and a journaling block. I hand stitched the grid lines, which did take quite a bit of time, so if you want to save time try machine stitching.

I wanted to balance out all those stitched lines so I stitched around each letter in the main word of my title. I also recreated the branches and berries from the patterned papers by stitching in some French knots and connecting them with a pen. This way, the stitching became incorporated into the design.
I love that Michelle used a "Thanksgiving" paperline for a Mexico Vacation - the colors are great with the blue and coral and she was even able to make the different embellishments and patterns work with her layout! The calendar grid is a great element that really helps to showcase her pictures!
Thanks so much, Michelle! Remember, you can see more of Michelle's work (and all of the Design Team) by clicking on their names on the right side of our blog!
We'll see you tomorrow!
Andi
Today we're sharing a calendar layout idea from Michelle - and it might make you a little jealous of where she spent her Holidays! Also, I want to point out that the paperline that Michelle used for her layout is the same that Debbie used for her card... they're so different, it really showcases the unlimited uses for this paper!
"Thanksgiving in Cabo" Layout
Featured Collection: Authentiques’s “Gathering” Collection
Cardstock: Bazzill Basics
Patterned Papers: Authentique
Stickers: Authentique
Alphabet Stickers: Authentique
Ribbon: May Arts
Floss: DMC
Ink: ColorBox Chalk
Dimensional Glaze: Glossy Accents by Inkssentials
Border Punch: EK Success
Strong Liquid Adhesive: Fabri-Tac by Beacon Adhesives
Other: needle, paper piercer, souvenirs (coins, keychain)
Sketch: Allison Davis
 |
| Thanksgiving in Cabo |


A great way to make a summary layout, like for the entire year or in this case a vacation, is to use smaller photos in a grid pattern. I didn't think I'd have time to make a layout per activity for the whole vacation, so by doing this, at least I have something documented of the trip while it was still fresh in my mind. Instead of covering every box with photos, I broke up the grid pattern a bit by replacing some the squares with souvenirs from the trip, a die cut, the title and a journaling block. I hand stitched the grid lines, which did take quite a bit of time, so if you want to save time try machine stitching.

I wanted to balance out all those stitched lines so I stitched around each letter in the main word of my title. I also recreated the branches and berries from the patterned papers by stitching in some French knots and connecting them with a pen. This way, the stitching became incorporated into the design.
I love that Michelle used a "Thanksgiving" paperline for a Mexico Vacation - the colors are great with the blue and coral and she was even able to make the different embellishments and patterns work with her layout! The calendar grid is a great element that really helps to showcase her pictures!
Thanks so much, Michelle! Remember, you can see more of Michelle's work (and all of the Design Team) by clicking on their names on the right side of our blog!
We'll see you tomorrow!
Andi
Wednesday, January 4, 2012
A Card from Debbie
Hello!
I hope you enjoyed Becky's layout from yesterday! Today we'll be reaching out to our card makers and sharing a card from Debbie! Let's take a look!
Authentique Birthday Card
Paperline: Authentique "Gathering" Collection

The base of this card is triple mounted in the brown/blue side of "Reminisce", solid blue, and the orange/blue side of "Grow". A fourth piece of the "Grow" ruler is the top layer and was cut smaller to allow room for the brown pleated ribbon at the bottom of the card. I folded a second piece of the ribbon and secured it with a small brad to form the bow. I covered the brad with a pearl.

The calendar was stamped in brown ink on cream cardstock and double-matted. I used one of the scalloped pieces from the Excerpts punch-outs to frame the upper corner of the calendar and pearl flourishes and folded paper petals to embellish the front of the card.
I used two tiny pearls to highlight the month and date of the recipient's birthday. This would be a great card to make in advance - just personalize the date before sending.
I LOVE the calendar idea on this card, it would be great to make a bunch of these in different paper/themes to get you through the year prepared!
We'll see you back here tomorrow with a layout from Michelle!
Andi
Subscribe to:
Posts (Atom)