I hope that you found some inspiration in the Design Team's projects from this month! There's nothing like starting the new year fresh and inspired to continue with or start papercrafts!
I don't know about you, but one of my "goals" - I don't do resolutions! - is to be more organized in 2012. I want to be able to find the "the little man that sits in the green tractor with the scoop and yellow letters" that my little boy asks for or my 7/8 circle punch along with my 1 1/4 circle punch that I NEED to use together on a project! So, to help keep you inspired with the New Year, we've decided to do a different type of Challenge this month!
Instead of our typical Challenge, we asked the Design Team to share any organizational tips or products that they feel might be helpful! We'll be sharing all of them this weekend in hopes that you'll feel inspired to organize your crafting space so you feel more productive and inspired!
Let's start off with a storage idea from Becky!
I will be completely honest here. When I saw that the upcoming challenge had to do with organization, I kind of panicked. My husband even laughed a little (he quickly covered it up) when I told him I had to give examples of how to organize the chaos that is my craft area. After a few weeks of, "What on Earth am I going to do?" I finally pulled it together. I decided to tackle some of my biggest problem areas for this challenge: ribbon, punches, and small embellishments.
The small embellishments and ribbons came together over a few evenings. A friend of mine was getting rid of some small fixtures and I asked if I could take a couple. I had purchased a package of small plastic bottles and the shelves were the perfect size for them. My best friend happened to be over as I was working on this and since she loves to organize, she got involved too. She brought me some baby food jars and I spray painted all of the lids silver. Then we got to sorting ALL of my small embellishments. I had no idea how much space all of that packaging was taking up! Then a different friend gave me some quart sized mason jars which were perfect for the ribbon!
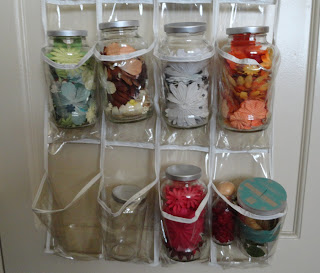
Next were the punches. I had an old, over the door shoe rack that I wasn't using so I hung it over the back of a door close to my desk and put all of my punches in the slots. I had also been saving spaghetti sauce jars (poor husband didn't realize why we had been eating so much spaghetti lately) which were perfect, after I spray painted the lids, for holding flowers. I had originally wanted the jars for ribbon but the opening was too small.
Although it took a lot of work, I am so happy that my craft area is beginning to look somewhat organized. I'm hoping that if my stash is easily accessible and in sight that I will actually begin to use some of it. So thank you for making me get to work!
And now let's hear from Debbie on what she uses to organize her paper!
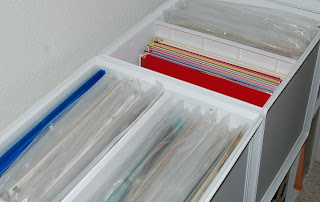
I like to buy patterned paper and coordinating cardstock at the same time, even if I don't have a specific project in mind. I store the "set" together in a 12x12 clear envelope that closes with a snap or button/string....or even the clear cellophane bag that Pages from the Heart uses for purchases.
The paper packs fit perfectly in ITSO storage cubes from Target. I turned the top two cubes on their sides and used a shelf as a divider so the packs would stand upright. The units also come in bright pink and black. You'll find them near the Rubbermaid/Sterlite storage bins at Target. The large cubes are $9.99 each and the fabric bins and shelf dividers are even less....they are often on sale.
And last, I wanted to share some of my office organization.
When we bought our home a few years I designed my office with a few goals in mind:
- to organize my office inexpensively
- to have my commonly used supplies easily accessible
So, I went to Ikea and found great storage solutions in their kitchen area! It was much less expensive than buying craft organizational items.
In another part of my office, my husband made a Die Cut Center for me. He made a half table and attached it to the wall and the built-ins. The table houses my large paper trimmer and Epic while the shelves immediately above the table have my dies and accessories.
We'll be back tomorrow with more great ideas and tips!
And here's how you can participate! Please email me at ayokleyjessup@gmail.com any tips or organization products that you use along with an explanation! That's it! The Challenge will end at midnight on Saturday, January 21! The winner will receive a goody bag full of product from Page's!
And, if you want to meet the Design Team, please join us at the first ever Design Team Crop taking place January 21 from 1-9! We'll have snacks, dinner and a great make-n-take for everyone that participates! We can't wait to meet everyone! Please call the store to make your reservation!
Thanks so much!
Andi


No comments:
Post a Comment