Background

Tuesday, March 20, 2012

Lucky Us!

The Winner!


We were so lucky this past weekend to have some of our favorite customers join us for our "Lucky March Crop"! St.Patricks Day will never be the same. We had green food, green cookies, green cups and green candies! We had a trivia game all about St. Patricks and we even "tossed some shamrocks"! One lucky winner got her crop paid for with our own hand-made scratch off lottery tickets.

Breaking News

Hold on to your hats, Ladies...Scrappy Glue has arrived!!  Oh Happy Day!!

Also, just in time for this first day of Spring, are new "Springy" days from Scrapping Cottage!

Debbie's Cards Reveal

Good Morning,

As Michelle mentioned yesterday, the March Assignment for the Design Team was to create their own embellishments, and I just have to say, that I've been very impressed with the different embellishments that each member has come up with!  I hope that you've seen something new and exciting too!

Today we're back with Debbie, who made 3 cards from her Authentique collection.  Let's take a look!

Cards Set by Debbie
Collection: Authentique Genuine Collection


My second project is a set of cards from the same Genuine collection.  The handmade embellishment is the ribbon and tag pin. 

 Look closely and you’ll see that it is a large safety pin onto which I tied 4” pieces of sheer patterned ribbon and hung three small tags from the “Details” sheet.   A small envelope with a “friend” letter – from that same “Details” sheet – perfectly complements the lined patterned paper on the second card.  And a variation of the pleated ribbon technique described in the tutorial above was used to make the ruffle on the third card.
Thanks, Debbie!  These cards look great, and it's so nice to see all the different ways she used the Detail sheet. 
We'll see everyone back tomorrow with a project from Becky!
Andi

Monday, March 19, 2012

Michelle's Layout Reveal

Good Morning,

I hope that everyone had a wonderful St. Patricks Day and there wasn't too much pinching!

Today we'll be sharing a beautiful layout that Michelle created using Authentique, the same line she used for her Lollipop Centerpiece.  Let's take a look!


Oh Baby, Baby by Michelle McClure
Since I was given Authentique's "Miracle Girl" collection to work with this month, I really wanted to utilize all the cute baby die cuts and stickers that are included in the kit. I decided to create a baby girl layout and luckily my little niece was willing to pose with me in matching animal ears jackets. Last month I made a wall hanging for her using this kit, but this time I wanted to make something I could keep. There are so many pieces in the kit, that I've made 5 projects already and I still have a lot of supplies left. You've seem two of the five now, all will be revealed in time.


 Supplies:
Featured Collection: Authentique's "Miracle Girl"
Cardstock: Bazzill
Patterned Papers: Authentique
Letter Stickers: Authentique
Die Cuts: Authentique
Ribbon: May Arts
String: Making Memories
Eyelets: Making Memories
Eyelet Setter: Making Memories
Pen: Pentel
Stamps: Inkadinkado
Ink: ColorBox, Ranger
Glossy Accents: Inkssential
Thread: Coats & Clark
Other: sewing machine

The Details:
One component of our assignment this month was to use handmade embellishments in our projects. I made a clothesline of baby clothes by first setting two eyelets on my layout and running some pink string through the holes. I stamped the same image twice onto two different patterned papers and paper pieced them together to create different colors on the same item of clothing. I also cut out the safety pins from a die cut in the kit and glued it on top of the onesie to look like it is holding the onesie onto the clothesline. I added some Glossy Accents to make it look like an epoxy sticker.


For the title, I used a die cut as the main title block. I added a smaller die cut to accent it. I used some alphabet stickers for the subtitle. To match my subtitle of "10 finger 10 toes", I used my pinkie finger and stamped along one side of the title. It looks like part of the vintage paper, but it is a subtle way to embellish a page and further play with the theme.


Thanks so much for stoppin' by today!

Thanks, Michelle - I love this layout.  I love the softness, the colors, the photos... but I really think that the stamped embellishments turned out amazing.  They really do look like something that you would purchase!

Thanks for checking in today, we'll be back again tomorrow with another project from Debbie!
Andi

Friday, March 16, 2012

Heart Garland Tutorial

Good Morning!

Today I'll be sharing how I made the heart garland that was on my Shadow Box Tray from yesterday's reveal...
Supplies:
Old Book or Old Sheet Music
Fiskar's Heart Punch
Sewing Machine
Thread
Ranger's Distress Ink
Scrappy Glue

I started off by grabing my Fiskar's Heart Punch and some scrap book pages.  I punched a ton of hearts, but just do as much as you think you'll need.
I then inked the edges of each heart.  This is the most time consuming, but it does make a difference since you'll be layering your hearts.
Stack your hearts, one on top of the other, evenly (I used 2 different patterned hearts so you could see the contrast).


Take your stacked hearts to your sewing maching and start sewing.  I do one set of hearts at a time.  I don't backstitch, I just start doing a straight stitch down the center of the hearts.

Once I got started, I just kept adding hearts.  Once I was at the end of one heart, I'd grab another set and start all over, keeping them all on the same thread.  You can do as many as you want in a row.
Here's what they look like when you're done.  You can see just a little amount of thread between each heart set.  If you wanted more space you could keep sewing between each heart for a longer amount of time.
Just for my comfort, I then add a small dallop of glue to each of the ends - where the threads start and stop on the hearts.  I only do this to the first heart that I sew and the last - I don't worry about the hearts in the middle.  I use the glue inplace of backstitching.
I then separate each heart set so that you can see both of them.  I like this because it seems like it adds a little more dimension.
That's it!  Glue your heart banner to any card, layout or shadow box!  You could even just use these for home decor!

Well, that's it for me today!  I hope you have a great weekend, and maybe you can play along with us and try any of the tutorials that the Design Team has posted!
Andi

Thursday, March 15, 2012

Project Reveal with Andi

Good Morning,

Today is my turn to share a project that I made - yay!  I was given October Afternoon's Farm House line, which is one of my favorite OA lines of all time!

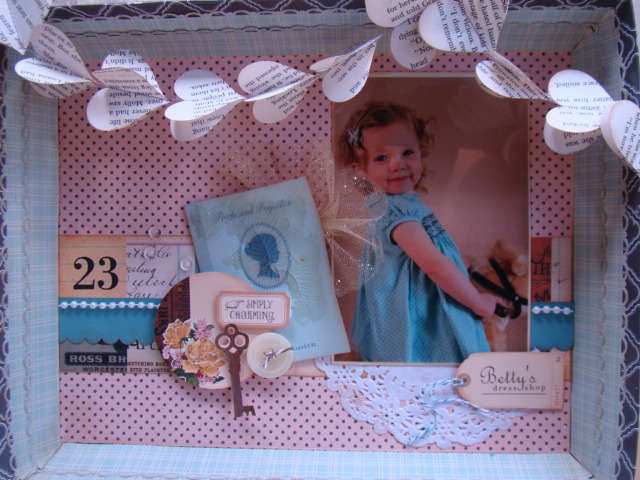
Shadow Box Tray by Andi


Supplies:
October Afternoon Farm House - Her Bureau
October Afternoon Farm House - Attic Trunk
October Afternoon Farm House Word Stickers
Bazzill Cardstock
EK Success Scallop Border Punch
May Arts Glitter Tulle
Inkssentials Crackle Glaze
Wilton Doily

Misc. Pearl Ribbon, Book, Thread, Button, Clear Dew Drops
Tray - Target $1 Aisle


I found this tray in the Target $1 aisle a few months ago - I picked up a gray tray and a bright pink tray with no real clue of how I was going to use it.  Part of the assignment for this month was to make a 3-D project with a handmade embellishment so I grabbed the tray and started at it.  I thought about actually keeping it as a tray and just decorating it, but then thought it might look good as a shadow box. 


I was super lucky to get October Afternoon's Farm House Line - most people that know me know that OA is one of my favorite paper companies and Farm House is one of my favorite lines!  Yay!  And fortunately, the paper that I got in my kit matched the gray and white tray.


I set to work gluing papers to the tray, starting with Her Bureau on the bottom of the tray and then scallop border punching 2 strips of Attic for each side.  Once that was done, I just started treating this as I would any layout, so I started layering paper, stickers, doilies, etc around where I wanted to place the photo.


I did a lot of hand cutting from the reverse side of Her Bureau, I cut the Pride and Prejudice Book from there, along with the Betty's Dress Shop Tag and the sewing scissors.  I used a lot of dimensional tape so that I would have different embellishments at different levels to keep the eye moving.  I added glittery tulle behind the book so give it some pizazz and the Dew Drops and Button because it was looking a little flat without them.  I added Crackle Accents to the Book and the scissors to help age them a little.


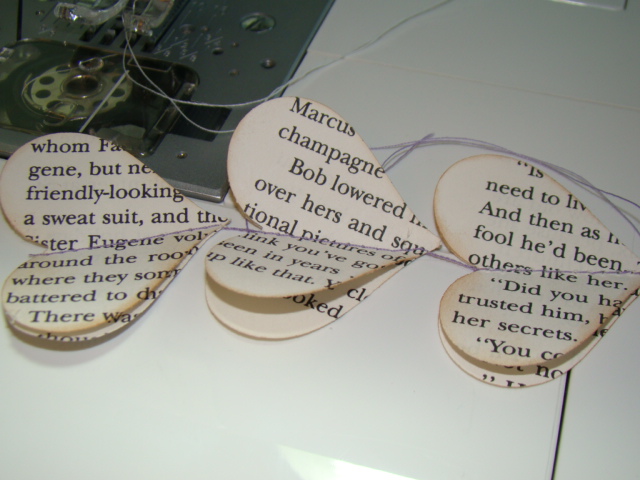
I made the heart garland from a Fiskars Heart punch, an old book and my sewing machine.  I'll be sharing a tutorial on that tomorrow!
Thanks for stopping by to take a look!  I hope you get a change to play with Farm House - it's a paperline that inspired me!

I'll see you back here tomorrow for the heart garland tutorial!
Andi


Wednesday, March 14, 2012

Dahlia Flower Tutorial with Becky

Good Morning!

We're back today with another great tutorial - this one is from Becky on the Dahlia Flower that she used on a card in yesterday's post.  Let's take another look at the card and then we'll get started with the tutorial!


Dahlia Flower Tutorial with Becky
Supply List
Double-sided paper or cardstock
Circle punch
Xyron or adhesive of choice 

1. You will need to punch 8-9 circles for your petals (depending on how accurate or not your folding is) and one circle for your base. I like to use a circle that is a little larger for the base to give me a larger sticky surface.

2. Cover the base circle with adhesive. I have found that the best method for this flower is by using a Xyron, although covering the circle with a tape runner will work as well.

3. Begin folding the petal circles. You will fold each side in so that they come to a point. After you have folded a petal, start adhering them to the base circle, gluing the point as close to the center as possible. If you adhere each as you finish folding them, it becomes easier to see how big or small you should be folding the petals.

4. Finish your flower with a button, large jewel, or Epiphany epoxy.

Thanks, Becky!  Such a cute flower!  I'm feeling very spring-ish after all of these flower tutorials!  And another great way to use a basic circle punch!

We'll see you back here tomorrow with one of my projects!
Andi