Is everyone in the Christmas spirit? If you're still looking for ideas and inspiration, look no further! The Page's DT Members have been busy little elves, creating lots of projects to keep you busy and use your supplies!
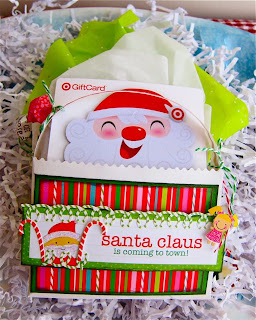
We're going to start off with a great Mini Envelope Gift Bag from Michelle! Let's take a look!
Supply List for Mini Envelope Gift Bags
Featured Collection: Santa’s Workshop from Doodlebug Design Inc.
Cardstock: Bazzill Basics
Patterned Papers: Doodlebug Design Inc.
Stickers: Doodlebug Design
Stamps: We R Memory Keepers
Twine: The Twinery
Ink: ColorBox Chalk, Delta
Glitter Glue: Stickles by Ranger
Decorative Scissors: Fiskars
Other: Buttons, Card Envelopes
Tutorial: http://www.doodlebugblog.com/2011/10/tuesday-tutorial-wendys-treat-bags.html
These are little gift bags that can be used to hold small presents or in this case, gift cards. The main part of this is made from a regular sized (A2) card envelope. You can use any sized envelopes that you have lying around, especially if you don't have the card to match anymore. Basically you just seal the envelope, slice off one end, score and fold 3/4" along the other three sides and open them up to make the little baggies. Then just decorate to your heart's content. I also made a handle that I attached with glue dots and then tied some buttons and origami stars using baker's twine. Doodlebug's Santa's Workshop line has a lot of cute stickers and tags that are the perfect size for this project.
Here is a front and back view of my snowman gift bag. One component to our assignment this month was to use baker's twine. I glued some twine in a circular pattern using Fabri-Tac for the holly berries on the tag that I popped up with foam tape. The cardstock stickers already come pre-glittered and the border stickers really finish out the scene.
Here is the front and back view of my Santa gift bag. This is also made from the same sized envelope as the snowman one, the only difference is I cut the opening along the wider edge. So from the same sized envelope, you can get two different shapes, taller and narrower or shorter and wider bags.
Thanks, Michelle! What a great idea! And I love how quick they'd be to embellish since DoodleBug has such great stickers!
We'll see you back here tomorrow with a project from Lauren!
Andi


No comments:
Post a Comment